Font Management in macOS, by Kurt Lang
Last updated July 29, 2022
This article deals with font usage in High Sierra 10.13.x through Monterey 12.x. Its main purpose is to show you where fonts are located on your system and which can be safely removed. The idea is to keep your font list as small as possible to avoid font conflicts (font conflicts are explained in Section 13). This article will benefit prepress operators and graphic designers the most, but can clear up font issues for most general users as well.
It should be noted that this article is written around the assumption that you are using English as your primary language. The minimum required fonts will be very different for other languages.
To view the older version of this article and access information back to OS X, 10.3, click here.
Click here to download a PDF version of this article.
Your only choices for Helvetica or Helvetica Neue (and a few others) now is to use either those supplied with the OS, or newer versions. Type 1 PostScript and Apple’s very old OS 9 style TrueType fonts conflict with the OS versions and are all but dead now anyway. For those who prefer, or require PostScript versions, you would need to purchase those in the OpenType PostScript format. That would be either Adobe’s LT Standard Helvetica fonts, or those from Monotype (Linotype). These do not conflict.
macOS has changed greatly with the past two releases. Mainly, locking down the system. This means I’ll be paring down the article to remove old info. Once I replace the FEX review with whatever Monotype’s new font manager is, this info will still be available as a second old article link. What will be going away in the live article?
1. Office 2011 and 2016 info. The activation servers for those are both shut down.
2. Any reference to macOS older than Big Sur in section 1 (and anywhere else).
3. The entire section 2. The user can’t touch the system installed fonts, so the info is obsolete.
4. The entire section 6. Same reason, you can’t control the base system fonts in Big Sur or later.
5. The entire section 20. The only way now to reinstall the system fonts is to reinstall the entire OS.
6. Any other references to outdated info (there will be quite a bit).
This version of the article is no longer being maintained. It lives on as a reference for the older OS and font information it contains.
To view the current article, click here.
What changed in this article update? (latest changes listed first)
• Font Menu Cleaner has been discontinued.
• Updated info on Helvetica with Suitcase/Connect Fonts. FontExplorer X Pro discontinued.
• Font cache handling has changed in Monterey (section 17). Updated again, 5/30/2022.
• Font manager review update 5/30/2022 - Info on the new Connect Fonts.
• Yes! You can now control many of the fonts installed by Big Sur and Monterey! (section 1)
Table of contents
Preface: Understanding terminology used in this article.
Sections:
2. Enabling and disabling System Integrity Protection
3. Known issues with disabled fonts
4. Fonts installed by Microsoft Office
5. What to do with Connect Fonts
6. Controlling Helvetica fonts for prepress
7. Font folder locations. Using Font Book
8. Various other fonts you can move or remove
9. Do you need a font manager?
10. What is a font suitcase and why do we have them?
11. FFIL and LWFN. What are they and which is which?
12. External vs. internal font names
14. Are you a good font, or a bad font?
15. Fonts you can and cannot use in macOS
18. Font 911. What to do in font emergencies
19. Determining if fonts are causing problems with applications
20. Reinstalling your macOS supplied fonts
Preface
I first want to mention the notation of file locations. By ’notation’ I am referring to the path name. This should help novice computer users and those unfamiliar with standard notation to learn how to navigate to the folders mentioned throughout this article.
I can’t tell you exactly what the path to your home account looks like (since I don’t know your short user name), so here are some handy notes of reference.
A file specification is the entire path from the root of the volume it resides on to the end of the file name. For example, here is the file specification for the Terminal application:
/Applications/Utilities/Terminal
This is known as a hierarchical file specification in geek terminology, but it’s called a canonical filename for short.
/ The beginning forward slash (as in the example to the Terminal application) of a file specification is always the root level of your boot volume.
~/ The tilde-forward slash pair is always your home directory (folder), i.e., the home folder of the current user login session.
So in most cases, the path to the Fonts folder in your home user account would be ~/Library/Fonts/. Which, if you start by double clicking the icon of the boot drive on the desktop, the path can also be presented as
/Users/your_user_account/Library/Fonts/.
The following words: program, application or app all have the same meaning. I use them interchangeably throughout this article.
1. Required fonts
This section examines each of the various macOS releases (High Sierra 10.13.x through Monterey 12.x) and provides the recommended minimum list of the fonts to be stored in the System folder for that particular release of the operating system in order for it and most third party applications to run properly. These lists also include the fonts most needed for the web, iLife and iWork. The fonts listed should always be active on your Macintosh for macOS and should not be removed.
Note that this first part of Section 1 covers only fonts required in the /System/Library/Fonts/ folder. There is also a root /Library/Fonts/ folder with its own set of required fonts, which will be addressed in the second half of Section 1.
From the font lists below, the San Francisco font set is used throughout the system font display purposes. This set, and the fonts HelveticaNeueDeskInterface.ttc and LucidaGrande.ttc must be present for the Finder and OS installed application menus to work.
All other fonts in the /System/Library/Fonts/ folder (that are not included in the lists below by release level) can be removed. You will need Administrative access to delete fonts from this folder. It is advised to save them for future use. Create a new folder on your hard drive and copy them there first. If there are any removed fonts you want to use for a project at a later date, they can always be activated with Font Book, Connect Fonts, FontAgent, FontExplorer X Pro, Typeface, or other font manager.
See section 6 on how to permanently remove Apple’s supplied versions of Helvetica and Helvetica Neue if this is important for you. System Integrity Protection was added to the OS beginning with El Capitan, 10.11.x, making it yet more difficult to remove unneeded fonts, but it can still be done up through Catalina.
Other than those fonts the OS absolutely requires to function, when it comes to the fonts you prefer to have on your system there is no right or wrong list. My idea of required fonts is based on years in prepress. So like most shops, the number of fonts throughout the system is kept to a minimum in the effort to make sure you will never have a conflict with the fonts a client sends with their project. Actually, the prepress and full service printers I’ve worked and freelanced for usually have a much shorter list than even those presented here. Sometimes the barest minimum of fonts they can get away with and still have the OS function. Such shops normally have no unnecessary software installed on their work stations; just what’s needed to get production work done.
This bare minimum setup has some advantage, but you will then be missing many fonts commonly used on the web. What then happens is that your browser ends up substituting the missing fonts with whatever is available. The result is that web pages will display so badly at times that it can be difficult (or even impossible) to navigate them. The bare minimum setup also lacks many fonts that Apple supplied applications require to operate. For most users, having only the bare minimum fonts on your system is not recommended.
You can find many different web sites telling you what the minimum font installation for each macOS release should be. Each site has its own reasons for including some fonts that I do not, and others don’t include fonts I think should be active. My main decision making was to run every application the OS ships with and many major third party applications, seeing what wouldn’t work if a particular font were missing. The end result is the list of fonts you find here. It’s a compromise between the Spartan set most prepress shops use, and what a more fully functional OS needs along with proper display of web pages.
Special Notes About Section 1 - Presented in no particular order as each OS release changes the rules a bit. Hopefully each is organized into its own paragraph, but no promises.
Readers who have followed this article for some time will note that Times and Symbol have been added to the required font lists. They were excluded before since this article was originally intended as a guide for prepress, when the article was also much shorter in length. So the lists have been modified to represent what the majority of macOS users should have in their /System/Library/Fonts/ folder, rather than the leaning towards the needs of prepress. For that reason, Courier has been added back into the minimum font lists for the System folder. As with Times and Symbol, remove Courier if it interferes with your need to use a PostScript version.
Users should be aware that not all font managers, and possibly other utilities, will list font names exactly as you see them here. For example, Connect Fonts’ interface lists Keyboard and Helvetica Neue Desk UI as having a period preceding their names (those come from the font’s internal names). Font Book also hides some fonts in its listings from the user in Snow Leopard and later, such as LastResort and Keyboard. But you shouldn’t be removing those fonts anyway.
If you haven’t already, purchase Adobe’s or Linotype’s new OpenType PostScript Helvetica fonts if you prefer, or require PostScript fonts for your output. They do not conflict with Apple’s Helvetica fonts, so you don’t have to fight with the OS supplied fonts as to which ones are active. Use Type 1 PostScript when you have to accurately reproduce a standing older project (see section 6 if this applies to you).
One thing to be aware of when you disable Apple’s Helvetica.ttc and HelveticaNeue.ttc, is that you are disabling quite a few fonts. This is because a .ttc file is a suitcase which can contain any number of individual fonts. The following list is based on High Sierra.
Helvetica: Regular, Bold, Bold Oblique, Light, Light Oblique, Oblique
Helvetica Neue: Regular, Bold, Bold Italic, Italic, Light, Light Italic, Medium, Medium Italic, Thin, Thin Italic, UltraLight, UltraLight Italic, Condensed Black, Condensed Bold
Beginning with El Capitan, Apple had almost released Helvetica and Helvetica Neue back to the user. Adobe, Microsoft and possibly other third party vendors have not. In High Sierra and later, it appears Apple has stopped using Helvetica and Helvetica Neue for the OS entirely.
Apple’s Grapher program is not something normally used in prepress, which relies on the fonts Times and Symbol. As clients frequently use other versions of Times and Symbol, the Apple supplied versions can be excluded from the lists below if you need them out of the way. See section 3 for more on Grapher.
A note on the MM fonts in the /System/Library/Fonts/ folder. Since Lion, the Mac OS has continued to install these Multiple Master fonts. Also since Lion, a Terminal command named fontrestore has existed, which attempts to move all third party fonts out of the System, main Library, and the active user account Fonts folders. Run with the -n option, it pretends to go through the steps without actually doing anything; though it still does create the folder Fonts (Removed) in the main /Library/, the /System/Library/ and the active user account folders. When the Terminal command is run, it produces this "error" message:
These fonts are not part of the default system install. They would have been removed to ’Fonts (Removed)’:
/System/Library/Fonts/HelveLTMM
/System/Library/Fonts/TimesLTMM
The message is wrong since a default install of macOS will install these files. Font Book runs the Unix command fontrestore under the option Restore Standard Fonts. When run, it does indeed remove the MM fonts. Proof enough for me they’re dead. For this reason, they are no longer included in the list of required fonts in High Sierra or later. The initial purpose for these fonts was to duplicate the Adobe Reader’s built in MM fonts for use in Preview. These MM fonts no longer exist in the Adobe Reader, and it appears Apple has followed suit, but hasn’t cleaned up the OS installers.
It should also be noted that this command does not restore all fonts installed by macOS you may have removed from the System or root Library folders. What is does restore are System and root Library fonts you may have removed that also exist in the hidden Recovery partition. This is a very incomplete set. Some will come back, but most won’t. The command also removes fonts which are not part of the macOS original installation. As such, it "restores" the /System/Library/Fonts/ folder and the /Library/Fonts/ folder to a state which only includes the fonts provided with macOS. The active user account Fonts folder gets emptied out.
To make your user account Library folder permanently visible, open your user account by double clicking the icon of the house within the Users folder. It must be the active folder in the Finder in order for this to work. The fastest way to get to this folder is to be on the desktop (so Finder is shown as the active app next to the Apple logo at the upper left) and press Command+Shift+H. Then choose View > Show View Options, or press Command+J. There will be a check at the bottom labeled Show Library Folder. If the correct user account folder is not open and selected, you will not see this check box.
Required fonts in the /System/Library/Fonts/ folder.
The following lists, arranged by the release level of Apple’s desktop OS, are the minimum recommended fonts. They represent the minimum number of fonts that allow all macOS supplied apps, and most third party apps to work. The latter being limited to what I can test. Always save copies of all installed macOS fonts before proceeding.
If there are apps you use that will not launch, or text is not displaying correctly after reducing your fonts to these lists, enable the copied fonts one at a time with your font manager (or just temporarily move or copy them into the Fonts folder of your user account) and test the app again. Keep adding until the app launches or displays successfully. Permanently add that font back to the system. As an example, some of the Adobe CS6 and CC 2019 apps will not launch if Helvetica is missing. Or, parts of them will not display properly. Such testing is sometimes more involved than that. For instance, the early release of Microsoft Office 2016 would not reliably launch unless HelveticaNeue.dfont was specifically in the /System/Library/Fonts/ folder.
Any time you manually remove fonts, you should clear the font cache files from the system. Remove all fonts first, then see section 17 for instructions. The method using Terminal at the bottom of that section is the easiest. If you use Font Book, you should reset its database (section 7)
In the attempt of being verbose, the System font lists were getting rather lengthy. To greatly shorten them, I’ve condensed the San Francisco fonts to one line. All fonts that start with SF or SFNS in the /System/Library/Fonts/ folder stay.
To remove fonts from the /System/Library/Fonts/ folder in High Sierra and Mojave, disable System Integrity Protection. With SIP disabled, you can put the system fonts you don’t want in the trash and empty it. No need to first restart the Mac before the OS will let you do that. Re-enable SIP when you’ve finished removing the fonts.
Simply disabling SIP does not work in Catalina. The safest method is to install Catalina on another drive or partition. You can then startup to any other bootable drive and remove system fonts from the non-startup drive without disabling SIP at all. Only your admin credentials are required. See section 2 for methods using Terminal.
For Big Sur and later, it isn’t possible to tinker under the hood. At least not without jumping through a lots of very dangerous hoops.
macOS, 12 Monterey
As seems to be how Apple releases their OS, one is a lot of new stuff thrown in. The next has less added and is a cleanup and optimizing release. Monterey is Big Sur’s cleanup OS.
Font Book allows the user to disable far more unnecessary fonts than Big Sur did. Almost to the same point as using Font Menu Cleaner (discontinued). Except for the highly annoying, and ridiculous number of Noto Sans fonts. Per the usual since Catalina, Font Book doesn’t even list these fonts, much less let you control them. Owners of Connect Fonts, Rightfont, Typeface and FontAgent can disable the Supplemental folder fonts with these font managers.
A bit amazingly, Monterey still allows the use of OS 9 legacy TrueType and Type 1 PostScript fonts. As in Big Sur, they do appear with a generic Unix EXEC icon, but they work.
Adobe announced over a year ago Type 1 PostScript font support would be dropped from Photoshop in 2021, and all other CS apps two years after that. It took until almost the end of the year for this to happen, but Photoshop 2022 no longer lists active T1 PS fonts. Dfonts and old OS 9 legacy TrueType fonts get a pass and continue to work.
macOS, 11 Big Sur
This section has been largely rewritten as it is now possible to disable many of the fonts installed by Big Sur. And now, it’s the second update to this section in just three days due to a new and even better choice for disabling the Supplemental fonts.
Big Sur has taken an even bigger step in security. It is now a Signed System Volume, much like iOS. You can’t view a Big Sur drive in any meaningful way from Catalina or older. If you boot to a Big Sur drive, the folder structure of another Big Sur drive looks as you would expect. But, you cannot modify even the non-startup drive from another Big Sur drive you booted to. This is great from a security standpoint, but is going to drive prepress professionals nuts.
"Houston. We have a problem.": Remember those five fonts (Athelas.ttc, Iowan Old Style.ttc, Marion.ttc, Seravek.ttc and SuperClarendon.ttc) that have been missing in Apple’s apps since El Capitan? Turns out, that’s not a mistake. It’s intentional! How do we now know that? Because Big Sur hides yet more fonts from itself. Like the 101 Noto Sans fonts in the Supplemental folder. Not only can’t you remove any fonts in Big Sur, Font Book doesn’t even list them all so you could at least have a choice to disable these and other unnecessary fonts.
Big Sur and any apps Apple writes will not show you many of the fonts the OS itself installs. You can’t get them to appear by using another font manager. You can’t copy them to another location and activate the copies in the hopes they’ll appear. They are invisible to everything Apple. At the same time, all third party apps do exactly what every app should do; they show you all active fonts.
Each and every developer can do the same thing Apple did. That is, hide fonts based on your language region. As we all know, this is what we have a font manager for. There’s no reason in the world why the user shouldn’t be able to control which fonts are active in one place, like we have for decades. Having to do this individually in every single app that displays a font list is unnecessary and just plain illogical. This makes Font Book extra useless since, even though it is a font manager, it doesn’t show you many of the fonts the OS installs. Which of course makes them impossible to manage. Font Book has always been a mediocre font manager at best. It’s now even less than that.
Much worse. If every developer did follow Apple’s lead (specifically, the API they use in all of their apps to hide fonts based on your language/region), the Mac would instantly become useless to the entire publishing industry. Need foreign fonts to work on a client project? Too bad. There would be no way to make them visible. Not without constantly changing your language in the System Preferences to make xxx visible for the moment, then back to English. Whoops! Missed something. Back to Devanagari, then back to English again. Not to mention, if you switch to such a language, you’d better be able to read everything in the OS that way until you go back to English. No sane person would want to use their computer this way. It has never made sense the user couldn’t at least disable the fonts in the Supplemental folder. The name of the folder itself tells you they’re optional and not needed by the OS.
Apple has the fonts split. Everything in the /System/Library/Fonts/ folder is used and needed by the OS in some manner. Not necessarily for English, but they are required for various regions or special needs purposes, such as Braille.
Those in the /System/Library/Fonts/Supplemental/ folder are just that - supplemental - and you should be able to disable those, but can’t with Font Book, Connect Fonts or FontExplorerX Pro. They’re all listed in the latter two, but you can’t do anything with them. It seemed impossible, so I didn’t bother testing with all font managers.
Latest information: Developer, John Daniel of Etresoft, Inc., has written the app Font Menu Cleaner (discontinued) to disable all fonts in the /System/Library/Fonts/Supplemental/ folder. This is an excellent and inexpensive utility to supplement (pun intended) Font Book, or any third party font manager that will not let you control the fonts in this folder.
It’s very easy to use. Click the Clean up button and it disables everything but the standard set of web fonts. You can still choose to turn any, or even all of the Supplemental fonts in the list off. Or back on if you need them for a project.
It was also earlier brought to my attention by one Sir RobLux that updates to Rightfont and Typeface can disable all of the OS installed fonts in the Supplemental folder.
I tested Rightfont first and it didn’t work (the latest version does work). It would supposedly let me deactivate all of the Noto Sans fonts, but there they all still were in Office, the Adobe apps, etc. Same result as Font Book.
Then I tried Typeface.
1. Open Typeface
2. Choose File > Import…
3. Navigate to the /System/Library/Fonts/Supplemental folder
4. Import the Supplemental folder
5. Deactivate away.
Following the instructions as written (adding the Supplemental folder, not the Fonts folder), you can indeed deactivate anything it adds. My font lists in Office, etc. went down to 50 or so fonts from over 250. All just from deactivating fonts virtually no U.S. speaking user ever needs. When you do need any of the Supplemental fonts for whatever project, you can temporarily turn them back on, just as we always have for decades.
You can add the System’s Fonts folder to Typeface if you want, but then you end up with a combined list of all of those fonts plus those in the Supplemental folder, and you can’t disable any of those located in the Fonts folder. It’s easier to add only the Supplemental folder. Since you’d want the majority of them off, it’s faster to disable the entire set in the left column, the individually turn important ones back on the right side of the interface. Like Arial, Comic Sans, Tahoma, etc. Basically, all of the common web fonts listed below under the Required fonts in the /System/Library/
Fonts/Supplemental/ folder for Catalina and Big Sur. heading.
Apps like Office, the Adobe suite and others load in less than a third of the time when there aren’t so many fonts to build a list for. They’re also just plain easier to use when the entire list of active fonts fits on the screen instead of having to constantly scroll through a ridiculous number of ones you’ll normally never use.
The last test was to see if the changes made would hold through a restart. Yes, it did. Without even having to launch Typeface afterwards. They all remained disabled. I tested this on an Intel, 2018 Mac Mini. Sir RobLux noted it works on both Intel and M1 Macs.
At $35, it’s a bit expensive to use Typeface only for the purpose of disabling fonts in the Supplemental folder. You can try either, or both apps as trial software to see what works for you. But why spend $50 for Rightfont when Typeface does the same thing for $35?
I’ve made note of Typeface’s ability to Linotype and requested they add this feature to FEX so I can do the same thing in a font manager I already own.
If you don’t use Font Book for your daily font management, do a Get Info on each font type you use to associate them with your preferred font manager so Font Book (or any other font manager you may have on your Mac) never opens when you double click any fonts in the Finder. Because like the excess fonts, you can’t get rid of Font Book, either.
You can also now temporarily disable fonts such as Arial, Times New Roman, Tahoma and others if you need to use an otherwise conflicting version. But you still cannot avoid creating font conflicts with those items in the /System/
Library/Fonts/ folder as you cannot disable these OS installed fonts.
macOS, 10.15 Catalina
By far, the biggest change is all OS supplied fonts are now in the System folder. I don’t know about anyone else, but I really like that Apple has pulled everything out of the /Library/Fonts/ folder. This means only user installed fonts will ever be there. Want to empty it at any given moment? Go ahead. You won’t be removing anything the OS may be looking for. All fonts that used to be in the /Library/Fonts/ folder are now in the /System/Library/Fonts/
Supplemental/ folder.
The downside? No matter what font manager you’re using, the OS does not allow you to disable fonts in the System folder. Since all OS installed fonts in Catalina are now in the System folder, you can’t disable them with any font manager. The one and only way to handle the OS supplied fonts now is to copy all unnecessary fonts to a separate folder you can control. Next, remove all of those same fonts from the System folder. Finally, handle the copies with your font manager so you can enable/disable them as needed.
In a change to OS security, the major parts of the OS and all of the OS installed apps and fonts are now on a read only partition. See more in section 2 on how to remove OS installed fonts in Catalina.
Apple has really cleaned up and minimized the necessary fonts in Catalina. The few oddball fonts that used to be necessary for the keyboard viewer or emojis in Messages have been fixed/removed. Such as, the need for
ヒラギノ角ゴシック W3.ttc has finally been eliminated. Its only remaining, previous purpose was so emojis would appear properly in Messages.
There are 24 San Francisco fonts, down from 71 in Mojave. Nice of Apple to cut down on having so many of these.
The slew of subset (stub) Asian fonts that used to appear in every app under Mojave are now properly hidden in Catalina. They’re deeply buried in the System folder. Font Book still shows them as grayed out items, but since you no longer incorrectly see them in your apps, they’re also not important.
The support fonts for the iLife/iWork apps (iMovie, GarageBand, Pages, Numbers, Keynote) that used to be in the
/Library/Application Support/Apple/Fonts/ folder, are now in the /System/Library/PrivateFrameworks/
FontServices.framework/Versions/A/Resources/Fonts/ApplicationSupport/ folder. Don’t move or remove these fonts. If you like, you can add these fonts as a set in your font manager so you can use them in your other apps. If you do, make sure they are added in place so you don’t create font conflicts. Though technically, it would still be a conflict since the OS already considers them active, and you’re activating them again so you can use them in your other apps.
If you thought Apple would have finally done something with the mysterious missing fonts issue, you’d be wrong. Athelas.ttc, Iowan Old Style.ttc, Marion.ttc, Seravek.ttc and SuperClarendon.ttc still appear everywhere – except in Apple’s own products. Well, some of Apple’s provided apps do use them, but you can’t. They won’t appear in the font lists of any Apple created app, such as TextEdit, Font Book, Pages, Numbers, etc. As with previous macOS versions, the only way to fix this is to replace these fonts with copies from Yosemite. Someone at Apple must really hate these fonts, or it’s turned into a running gag. It’s a mystery to me why this still hasn’t been fixed.
And now we get to add another one. Apple Chancery.ttf. When I look for this issue regarding Apple installed fonts, I simply open TextEdit and see what doesn’t appear in its font palette. Apple Chancery is there, so no problem, right? Buzzzz!!! Wrong!
This font is slightly less broken than the other five. Apple Chancery does indeed show in Font Book, but the only other app written by Apple I’ve found it will appear in is TextEdit. Preview and Pages are two I’ve tested that will not show Apple Chancery in their font lists. As with the other five mystery fonts, Apple Chancery will appear in all third party apps. The fix? It’s the same as the other five. Copy Apple Chancery from Yosemite and replace the version installed by any newer version of macOS.
I had a reader email me a while back saying they couldn’t use Zapf Dingbats in Pages. Nothing I tried could make it appear in the font list. After much playing around, I finally discovered you could copy/paste Zapf Dingbats text you set in TextEdit into Pages. You can do the same with Apple Chancery. Both will then appear above the line as a recently used font. That holds a maximum of six font names. After you’ve selected enough other fonts, you’ll walk Apple Chancery and Zapf Dingbats off the list. But once pasted in, you can keep typing in (example) Apple Chancery, with Pages all the while continuing to pretend the font doesn’t exist. Other than replacing Apple Chancery with a copy from Yosemite, using TextEdit as a bridge is the only workaround I’ve found to get a font into Pages it won’t show you in its own list.
The 10.15.5 update added a lot of fonts to the OS, though you have to choose to download them through Font Book. There are 103 files in total, which are more fonts than that since many are .ttc fonts and have more than one typeface in them. All together, they make up 277 more fonts. All of which get installed to various subfolders at /System/Library/AssetsV2/ .
The majority of these are foreign language fonts. Like, at least 90%. As you go through the grayed out fonts in Font Book, you’ll see what’s what in the previews.
Which kind of leads to point two. Many of these are not new and have been installed with the OS for quite a while. In Yosemite, they were right in the /Library/Fonts/ folder. Later, they were deeply buried. Like the 48 items installed here by Mojave:
/System/Library/Frameworks/ApplicationServices.framework/Versions/A/Frameworks/ATS.framework/Versions/
A/Support/FontSubsets
There are many that are truly new and haven’t been in any previous release of macOS or OS X. But unless you’re able to read them, most aren’t of any use to an English speaking user.
That’s not to say there are no Latin glyphs to use. They almost all have a simple set of glyphs you can use for English that are essentially pulled from other fonts. Like Xingkai SC Bold. If you type away in English, you’ll get what is pretty much Brush Script. Others have a basic Times like font in the English/Latin positions. But with Xingkai as the example, what it really exists for is its over 46,000 Kanji characters.
Those new fonts an English speaking user would actually want are the following:
Canela
Domaine Display
Founders Grostesk
Graphik
Produkt
Proxima Nova
Publico
Quotes
Sauber
Spot Mono
Because of where Font Book installs these fonts, only Apple’s apps can see them. If you want to use them everywhere, copy or move them to your user account Fonts folder, or the main /Library/Fonts/ folder. Or, of course, set them aside wherever you want and activate them with your font manager.
The minimum fonts recommended for Catalina in the /System/Library/Fonts/ folder are:
Apple Color Emoji.ttc
AppleSDGothicNeo.ttc
Avenir.ttc
Courier.dfont
Geneva.dfont
Helvetica.ttc
HelveticaNeue.ttc
HelveticaNeueDeskInterface.ttc
Keyboard.ttf
LastResort.otf
LucidaGrande.ttc
Menlo.ttc
Monaco.dfont
PingFang.ttc
SFCompactDisplay.ttf
SFCompactRounded.ttf
SFCompactText.ttf
SFCompactTextItalic.ttf
SFNS… (all other San Francisco fonts)
Symbol.ttf
Times.ttc
ZapfDingbats.ttf
See below for the Supplemental subfolder.
Fonts updated in 10.15.1
Apple Color Emoji.ttc
ArabicUIDisplay.ttc
ArabicUIText.ttc
macOS, 10.14 Mojave
Apple has again expanded the number of San Francisco fonts in macOS. There are now 71 in Mojave (79 in the original release). The required fonts for Mojave are the same as High Sierra, plus the new, additional SF fonts.
A reader has found there’s one more font that needs to be available in High Sierra and Mojave. If NotoSansSyriacEastern-Regular.ttf is missing, the return key arrow doesn’t display in the Keyboard Viewer. Instead, you get the boxed question mark from the font, LastResort.
This makes no sense at all. Viewed in a font editor, there isn’t even a return arrow glyph in that font! And yet, it has to be on the drive in High Sierra and Mojave for the keyboard viewer to display correctly. Not only that, this font isn’t in the normal System or Library Fonts folders. It’s at, of all places, /Library/Application Support/Apple/Fonts/Language Support/, along with a slew of other Noto Sans fonts.
If not seeing this arrow bugs you, and you’ve emptied out the above mentioned folder of what should be unnecessary fonts, you need to put NotoSansSyriacEastern-Regular.ttf back on the drive. And you can’t put it back in its original location. You must put it in either the root /Library/Fonts/ folder, of the Fonts folder of your user account. I can only guess that’s because it relies on some bizarre chain of available fonts for it to work from the original location.
Apple continues the orphanage of a handful of its own supplied fonts. Those currently being Athelas.ttc, Iowan Old Style.ttc, Marion.ttc, Seravek.ttc and SuperClarendon.ttc. As before, you can use these fonts in any third party app, but they will not appear in any app written and supplied by Apple. The fix is the same as in High Sierra. You must retrieve the same named fonts from Yosemite and replace those installed by Mojave.
There’s an issue now with most font managers, including Font Book. If you try to reactivate copies of any removed fonts from the /System/Library/Fonts/ folder with your font manager, most will not appear in its list of imported fonts. You may also get a message about not having permission to read the fonts.
This only happens with fonts you’ve removed from the System folder, and only with some, but not all font managers. Font Book, Connect Fonts and FontExplorer X Pro all have problems with these fonts. FontAgent is unaffected.
Fortunately, there’s a simple solution. If you do need any fonts previously in the System folder activated, you can manually place them in the Fonts folder of your user account.
The minimum fonts recommended for Mojave in the /System/Library/Fonts/ folder are:
Apple Color Emoji.ttc
AppleSDGothicNeo.ttc
Avenir.ttc
Courier.dfont
Geneva.dfont
Helvetica.ttc
HelveticaNeue.ttc
HelveticaNeueDeskInterface.ttc
Keyboard.ttf
LastResort.otf
LucidaGrande.ttc
Menlo.ttc
Monaco.dfont
PingFang.ttc
SF… (all San Francisco fonts)
Symbol.ttf
Times.ttc
ZapfDingbats.ttf
ヒラギノ角ゴシック W3.ttc
Fonts updated in 10.14.2
Apple Color Emoji.ttc
Helvetica.ttc
HelveticaNeue.ttc
HelveticaNeueDeskInterface.ttc
Menlo.ttc
Fonts updated in 10.14.3
The 10.14.3 delta update contains all of the same updated fonts as 10.14.2 (except Apple Color Emoji), but there are no changes. They are exactly the same versions and sizes as previous.
Fonts updated in 10.14.4
Well, here’s a new one! Apple removed a handful of system fonts. All nine of the previous San Francisco SFNSRounded fonts are deleted by the update and replaced with the single item, SFNSRounded.ttf.
Fonts updated in 10.14.5
Apple Color Emoji.ttc
Symbols.ttf
In the /Library/Application Support/Apple/Fonts/iLife/ folder, DrukHeavyItalic.otf has been replaced by Druk-HeavyItalic.otf. Added are DrukText-Bold.otf and DrukWide-Medium.otf.
macOS, 10.13 High Sierra
I like easy. This version of the macOS turned out to be like that. The minimum fonts are almost the same as Sierra. There are quite a few more San Francisco fonts than previous. In Sierra, there were 33. In High Sierra, there are now 58.
An early update to High Sierra changed something that affected the display of emojis in Messages. Possibly a framework installed for the Safari 11.0.1 update. Whatever the cause, Messages now requires the fonts AppleSDGothicNeo.ttc and ヒラギノ角ゴシック W3.ttc to display emojis. Otherwise, all you get is the question mark in a box from the font LastResort. These two fonts have been added to the minimum font list for the System folder.
The five (now six) fonts that will not work properly in El Capitan or Sierra (Athelas.ttc, Charter.ttc, Marion.ttc, Seravek.ttc and SuperClarendon.ttc) continue to be a problem in High Sierra. The issue was momentarily fixed in Sierra, but they went missing again as of 10.12.2. These five fonts remain in limbo with High Sierra. Iowan Old Style.ttc has joined this list in High Sierra.
When I first tested the original five known problem fonts upon High Sierra’s initial release, renaming the fonts still worked. One of the recent updates to High Sierra caused renaming the fonts to stop working. It made me wonder if removing the buried .ATSD and .fontinfo data still worked.
I booted into Recovery mode to turn SIP off, then removed all of the info data for those fonts. Nothing! Not after a restart, clearing font caches, or renaming the fonts on top of removing the data info. None of Apple’s apps will recognize these six fonts as being on the system. Microsoft Office, Adobe’s and everybody else’s software does. Just not Apple’s.
At this time, the only fix is to copy these fonts from Yosemite and completely replace the High Sierra versions. That is, if you need to use these six particular fonts in Pages, TextEdit, or whatever Apple software you’re using.
10.13.4 updated quite a few fonts, one of which was Charter.ttc. That font now works everywhere. Yay! However, Apple continues to ignore the other five that don’t work. Boo! You still need to pick up Athelas.ttc, Iowan Old Style.ttc, Marion.ttc, Seravek.ttc and SuperClarendon.ttc from Yosemite if you want to use them in any of Apple’s supplied apps.
Here’s one I didn’t think I’d ever see, and is something press and prepress shops in particular will love! Though I can’t fully guarantee this, it looks like Helvetica and Helvetica Neue are now completely unhooked from the OS. Removed from the System folder, there wasn’t a single OS supplied app that wouldn’t launch, or behave incorrectly with them gone. I would have to assume the OS and all Apple supplied apps now use San Francisco for all display purposes.
Experiment as you wish with this possibility if you’re of the group that has to wrestle with the OS versions of Helvetica and Helvetica Neue conflicting with your older Type 1 PostScript versions. All of the Adobe CC 2018 apps I have installed launched without either font set active. But, Premiere Pro displayed boxed question marks (from the system font, LastResort) where the timer numbers should be. So it is obviously using either Helvetica or Helvetica Neue. Office 2016 surprised me. Given the fact it wouldn’t even launch in its earlier point release versions if Helvetica Neue was missing; Word, Excel, PowerPoint and Outlook all launched and behaved as if nothing were wrong.
This is all moot for most users. Helvetica and Helvetica Neue are used rather extensively on the web. And other than people like me who have to work around these fonts in prepress, there isn’t a good reason to remove them. So, I’ve left Helvetica and Helvetica Neue as required fonts.
Apple has just about killed off their proprietary .dfonts in favor of OpenType. There are only three .dfonts left in High Sierra. Courier, Geneva and Monaco. Even the fonts in /Library/Application Support/Apple/Fonts/ are now all .ttf or .ttc. The only three that aren’t are in the Deprecated folder.
The minimum fonts recommended for High Sierra in the /System/Library/Fonts/ folder are:
Apple Color Emoji.ttc
AppleSDGothicNeo.ttc
Avenir.ttc
Courier.dfont
Geneva.dfont
Helvetica.ttc
HelveticaNeue.ttc
HelveticaNeueDeskInterface.ttc
Keyboard.ttf
LastResort.otf
LucidaGrande.ttc
Menlo.ttc
Monaco.dfont
PingFang.ttc
SF… (all San Francisco fonts)
Symbol.ttf
Times.ttc
ZapfDingbats.ttf
ヒラギノ角ゴシック W3.ttc
Fonts updated in 10.13.1
Apple Color Emoji.ttf
Gurmukhi MN
Fonts updated in 10.13.2
In the /System/Library/Fonts/ folder:
Apple Color Emoji.ttc
ArabicUIDisplay.ttc
ArabicUIText.ttc
Geneva.dfont
SFNSSymbols-Regular.otf
In the /Library/Fonts/ folder:
DIN Condensed Bold.ttf
Malayalam MN.ttc
Malayalam Sangam MN.ttc
Oriya MN.ttc
Oriya Sangam MN.ttc
Fonts updated in 10.13.4
In the /System/Library/Fonts/ folder:
Apple Color Emoji.ttc
ArabicUIDisplay.ttc
ArabicUIText.ttc
GeezaPro.ttc
SFNSDisplay-BlackItalic.otf
SFNSDisplay-BoldItalic.otf
SFNSDisplay-HeavyItalic.otf
SFNSDisplay-LightItalic.otf
SFNSDisplay-MediumItalic.otf
SFNSDisplay-RegularItalic.otf
SFNSDisplay-SemiboldItalic.otf
SFNSDisplay-ThinItalic.otf
SFNSDisplay-UltralightItalic.otf
SFNSDisplay.ttf
SFNSText.ttf
SFNSTextItalic.ttf
In the /Library/Fonts/ folder:
Charter.ttc
DIN Alternate Bold.ttf
DIN Condensed Bold.ttf
Gujarati Sangam MN.ttc
Rockwell.ttc
Fonts in the 10.13.5 delta update
There are many fonts in this update that were supplied with 10.13.4. However, none of them are actually new. All of the fonts in the 10.13.5 update have exactly the same sizes, creation dates and version numbers as in 10.13.4.
Required fonts in the /System/Library/Fonts/Supplemental/ folder for Catalina.
Required fonts in the /Library/Fonts/ folder for High Sierra and Mojave.
These two folder locations contain many standard web fonts. They are identical. In Catalina, Apple has moved all of the fonts that used to be in the root Library folder to a subfolder in the System’s Fonts folder. The only exception in Catalina is it has one item in the otherwise empty /Library/Fonts/ folder; an alias that points to Arial Unicode.ttf in the /System/Library/Fonts/Supplemental/ folder. Since this is not a required font, it will simply be an alias that points to nothing when you reduce your system to these minimum font lists. You can either leave the alias, or delete it. You cannot modify these folders at all in Big Sur or later.
At minimum, the following fonts should remain in order for web pages to display properly. The names below are how they will appear in High Sierra, 10.11 through Catalina, 10.15.
Recommended minimum fonts for the /System/Library/Fonts/Supplemental/ or the /Library/Fonts/ folders:
AppleGothic.ttf
Arial.ttf
Arial Bold.ttf
Arial Italic.ttf
Arial Bold Italic.ttf
Arial Black.ttf
Arial Narrow.ttf
Arial Narrow Bold.ttf
Arial Narrow Italic.ttf
Arial Narrow Bold Italic.ttf
Comic Sans MS.ttf
Comic Sans MS Bold.ttf
Georgia.ttf
Georgia Italic.ttf
Georgia Bold.ttf
Georgia Bold Italic.ttf
Impact.ttf
Tahoma.ttf
Tahoma Bold.ttf
Times New Roman.ttf
Times New Roman Bold.ttf
Times New Roman Italic.ttf
Times New Roman Bold Italic.ttf
Trebuchet MS.ttf
Trebuchet MS Bold.ttf
Trebuchet MS Italic.ttf
Trebuchet MS Bold Italic.ttf
Verdana.ttf
Verdana Bold.ttf
Verdana Italic.ttf
Verdana Bold Italic.ttf
Wingdings.ttf
Wingdings 2.ttf
Wingdings 3.ttf
Webdings.ttf
A reader contacted me about another set of fonts you may want to have active at all times. The 29 STIX fonts are filled with math symbols. While there are quite a few common symbols in the other required fonts, there are many more in the STIX sets. This is of course important to mathematicians, or anyone else who routinely use these symbols. He found that at minimum, you should have the general set enabled.
STIXGeneral.otf
STIXGeneralBol.otf
STIXGeneralBolIta.otf
STIXGeneralItalic.otf
Depending on your needs, you may want all of them.
All other fonts in the /System/Library/Fonts/Supplemental/ or the /Library/Fonts/ folder can be removed.
If you use iLife or iWork: The following fonts are also located in the /Library/Fonts/ folder. For Catalina, they are in the /System/Library/Fonts/Supplemental/ folder.
While the iLife and iWork apps will launch without the following fonts, the supplied templates use them. Apple suggests these fonts always be available for these apps.
AmericanTypewriter.ttc
Baskerville.ttc
BigCaslon.ttf
Chalkboard.ttc
Cochin.ttc
Copperplate.ttc
Didot.ttc
Futura.ttc
GillSans.ttc
Herculanum.ttf
Hoefler Text.ttc
Optima.ttc
Papyrus.ttc
Of the above list, the font Optima.ttc is in the /System/Library/Fonts/ folder.
Once you have manually reduced the fonts on your system to the minimum, always use your font manager to control all other font activation and deactivation. The better font managers will stop you from creating font conflicts. Your font manager can’t help prevent that if you manually place fonts you want to use in a Fonts folder.
An important step you should take after manually removing fonts is to clear the font cache files from the system. See section 17 for the proper procedure. Font Book users should also reset the application to update its database. See section 7 for more details.
When it comes to font managers, there’s one thing I can’t stress enough: have only one font manager on your Mac at a time.
When you double click a font, macOS no longer launches multiple font managers if they’re installed, and hasn’t for a while. It will only launch the one assigned to your fonts. Though even that can mean different font managers if for instance, Font Book is still assigned to older legacy Mac TrueType fonts, and everything else to your third party font manager. That’s a problem when you don’t really want to use Font Book. Having Font Book’s database on the system can prevent another font manager from working correctly, and just the act of having Font Book launch creates a new database. Then you have to remove the database again. So if you aren’t using it, you should not have Font Book on the drive. See section 7 on the steps for completely removing Font Book and its database. Note that you can’t do this in Big Sur or Monterey.
A scenario of having more than one active font manager: You open a font in Connect Fonts. Then later, you open the same font in FontExplorer X Pro. You then disable that font in Connect Fonts. However, the font is still active in all of your applications. Why? Because FontExplorer X Pro is still holding the font open. I used Connect Fonts and FontExplorer X Pro for this example, but this will happen in virtually any case of multiple font managers on your system. Once you have decided which font manager you are going to use, completely remove any other font manager from your Mac.


2. Enabling and disabling System Integrity Protection
For Catalina, and most likely future releases of macOS, much of the OS is now on a read only partition. Disabling SIP does not grant you the access to remove fonts that are on the same volume you started up to.
The safest way to remove fonts in Catalina is to install Catalina on another drive/partition. Once you start up to the secondary Catalina installation, you can delete whatever you want from the non-startup drive without disabling SIP. Only your admin password is required.
This can also be done from a Mojave or High Sierra startup drive. You just need to open the correct volume. A Catalina install from an older OS (that can also read an APFS drive) will appear as two separate desktop items. One with the name you gave to the partition you installed Catalina to, and a second with the same name, but with - Data appended to it. Double click the desktop icon without the - Data extension and navigate to the /System/Library/Fonts/ folder.
I’ve gotten a few emails noting you can remove fonts with SIP disabled. I did know this, but because you can do serious damage very quickly to a computer using the command line in Terminal, I usually try to avoid listing such instructions. However, if you’re familiar with Unix, these methods take less time than installing Catalina to another drive/partition. I should say it’s faster for a single user. If you’re a system admin and need to pare the fonts down on multiple Macs, carrying a bootable external drive to each Mac will take far less time.
This also works with Macs that employ the T2 security chip. The instructions for the following methods are intentionally somewhat vague (such as how to navigate to a particular volume or folder). If you don’t already know how to do this, you shouldn’t be trying it. Not without first reading up on using the Unix command line.
Absolutely – do not pass Go, do not collect $200 – until you have a full, restorable backup on hand before proceeding.
Method 1:
The nerd method. ;-)
1. Restart into Recovery Mode (restart the Mac and immediately hold down the Command+R keys).
2. Launch Terminal from the top menu bar. You do not need to disable SIP.
3. Navigate to the /System/Library/Fonts/ folder.
4. Type ls (lower case L and s for list) and then Enter to ensure you are in the correct folder. A list of fonts should fill the Terminal screen.
5. Use the rm (remove) command to delete individual fonts, or in groups using a wildcard.
a) rm muktamahee.ttc (Enter) will remove the one font. The full name is not case sensitive.
b) Wildcards are case sensitive. If you enter the command …
rm notosa*
… you’ll get an error message the folder doesn’t exist. But the command …
rm NotoSa*
… will successfully remove all of the NotoSans fonts.
c) Be very cautious using wildcards. For example, rm Not* will remove not only the NotoSans fonts, but also Noteworthy and NotoSerifMyanmar.
6. You can retype ls after any completed command to check and see what’s left to remove.
7. When you’re done in the /System/Library/Fonts/ folder, navigate to the /System/Library/Fonts/Supplemental/ folder and continue removing fonts.
8. When finished, type reboot to restart the Mac.
Method 2:
Most may prefer this method as you can see what’s happening within the GUI as you go.
1. Restart into Recovery Mode (restart the Mac and immediately hold down the Command+R keys).
2. Disable SIP by entering the command:
csrutil disable
3. Then enter the command reboot to startup back to the Catalina desktop.
4. Once back at the desktop, open Terminal and type the following command:
sudo mount -uw /
This must be exactly as written. Besides the more obvious spaces after each of the first two words, there’s also a space between between -uw and the trailing forward slash. Press Enter, then your admin password when prompted.
The easiest way to keep track of what you’re doing is to open the System folder’s Fonts and Supplemental folders in List view as a visual reference. Position items so you can see Terminal and the font lists at the same time.
5. Go back to Terminal. You can’t just drag fonts to the trash in the GUI. You must still use Terminal to remove them.
6. Navigate in Terminal to the /System/Library/Fonts/ folder.
7. Unlike method one, you must also use the sudo command with rm. Without sudo, you’ll be told you lack the permissions to remove the fonts. Removing all of the NotoSans fonts at once would be:
sudo rm NotoSa* (Enter)
An alternative that doesn’t require you to navigate anywhere in Terminal is to type sudo rm with a space typed after rm. Don’t press Enter yet. Drag a font you want removed into Terminal. Its path and name will be appended. Now press Enter. Repeat for each font you want to remove.
You can also use wildcards this way. Using the NotoSans fonts again as an example, after dragging one of the NotoSans fonts into Terminal, use the backspace/delete key to edit the full font name down to NotoSa, type an asterisk *, and then press Enter.
8. Continue removing fonts from the Fonts and Supplemental folders. Close Terminal when done.
9. Restart into Recovery Mode. Re-enable SIP in Terminal by entering:
csrutil enable
Type reboot to return to the normal desktop.
For High Sierra and Mojave, you can still use the simpler method of disabling SIP to remove fonts.
To enable or disable SIP, you can:
1) Restart and hold down the Command+R keys to boot into Recovery Mode.
2) Restart and hold down the Command+Option+R keys to boot into Internet Recovery Mode.
3) Start up to a bootable USB flash drive you have created using a full installer of High Sierra or later. Use the OS version that matches what you have installed on your Mac. Plug in the flash drive, restart the Mac and immediately hold down the Option key. Choose your flash drive from the menu of available startup drives with either the mouse or keyboard.
For any of the three methods, once at the main work screen, launch Terminal from the Utilities menu. Enter the command:
csrutil disable
You should get a message that System Integrity Protection has been successfully disabled. Then enter the command:
reboot
You can now remove fonts from the /System/Library/Fonts/ folder while booted to High Sierra or Mojave. The OS will behave the same as in Yosemite and earlier. Put the fonts you want to remove in the trash, enter your admin password when prompted, and then empty the trash.
It’s not a good idea to leave System Integrity Protection disabled. The idea of it is to protect system folders from malware that already exists (mostly in the form of adware at this time), and is beginning to become more prominent in macOS. With SIP enabled, such software will not be able to install to critical system folders. If they do (such as kernel extensions), the software will not be allowed to run. SIP also protects apps installed by macOS from injection of unwanted code.
Once you have pared down your fonts in the /System/Library/Fonts/ folder and deleted them, startup according to one of three above methods again. Only this time in Terminal, enter:
csrutil enable
You should get a message that System Integrity Protection has been successfully enabled. Then enter the command:
reboot
3. Known issues with disabled fonts
This section describes other fonts you may need available at all times depending on the software you use.
Apple Gothic
In macOS, the Messages app will not launch if Apple Gothic is missing.
Geneva
I have found no reference that requires Geneva, but it’s best to leave it as it has long been a standard font for the Macintosh OS.
Helvetica
Some of the macOS supplied applications that will not launch if Helvetica is missing are mentioned in Apple Knowledge Base article TA22311. While not listed in that particular article, iChat is another application which requires Helvetica, as does iCal. If you’ve seen the message, "Internal Error" when starting iChat, you’re missing Helvetica.
Some Adobe CS/CC apps will not launch if Helvetica is missing.
Mail in High Sierra still has a dependency on one of the Helvetica fonts. It will launch and display normally if Helvetica is missing, but if you do a Search, the Results listing will fall back to LastResort.
Helvetica Neue
The Office 2016 apps will not launch if Helvetica Neue is missing (earlier point releases only, now fixed).
There’s no good reason to remove the macOS supplied versions of Helvetica or Helvetica Neue unless you work in prepress, advertising, design, etc., where you must be able to use a different version of these type faces (see section 6). If you don’t, leave them be.
iPhoto 7 and iLife 08 both require the presence of Helvetica Neue.
Mail also requires MarkerFelt, or the Notes portion of the application won’t open. Notes has been separated as an individual app from Mail starting in Mountain Lion 10.8.
MarkerFelt
iReal Pro requires MarkerFelt to launch.
Times
If you are using the Monaco (X-Rite) GamutWorks application, it requires Times to function. This can be the Times.dfont supplied with macOS, an OpenType or a Type 1 PostScript version. But it must be Times. Times New Roman or any other variation of the Times typeface will not work. This is actually outdated information since GamutWorks is PowerPC only software.
Apple’s Grapher application also requires Times. Like Monaco’s GamutWorks, it must specifically be Times. In addition, Grapher also requires Symbol. Without Times, Grapher will not launch, instead giving you a message that there was a problem with the application. If you have Times open but not Symbol, Grapher will launch but then erroneously tell you there is a font conflict, when in reality it’s just that Symbol is missing.
Symbol
MailMate requires Symbol.
Zapf Dingbats
iTerm2 requires Zapf Dingbats.
ヒラギノ角ゴ ProN W3
If you are using DxO Optics Pro, even if English is set as your language, it will fail to launch if this font is missing.
4. Fonts installed by Microsoft Office
Information from Microsoft is being noted here. As users have likely already realized for themselves, when you dig into an application package and modify anything, you are taking the risk of causing the program to function incorrectly. In all cases of such modifications, as relayed by a Microsoft engineer, doing so "breaks the code signature of the app, and is unsupported." So, proceed at your own risk and keep that in mind for any of the following information for Office 2016, 2019, 2021 or 365.
I’ve revamped this entire section as it was horrid mess of mixed instructions where you needed to do things such as looking under Office 2016 to get some removal information for Office 365/2019/2021 and visa versa. It’s now arranged as follows.
• Since readers will, for the most part, be looking for info on the latest version, they will always be on top. Previous point versions for the same release will be next. Followed by older versions of Office.
• To avoid having to skip around the article, you’ll find all of the necessary info for one version of Office in one place. That means I’ve cloned some text to another version, which may make the article a bit longer overall. But it will be far easier to follow when what you need to know for a given version is all under one heading.
• There was also a lot of completely outdated information. Such as anything to do with the 32 bit version of Office 2016 (the early 15.xx versions). I’ve also purged a lot of other older junk no one needs anymore since you should always be using the latest version of Office in order to have the most recent bug fixes and security updates.
As a general note, virtually all supporting files for Office 2016 and newer have been moved to the user account folder,
/Users/your_account/Library/Group Containers/UBF8T346G9.Office/. Within this folder, you’ll find the Normal.dotm template, your email data, and pretty much everything else related to your personal Office information.
There is a font limit in Office. The apps used to show just about every open font. At one time, you could have over 14,400 fonts open and they would list. It also had a very specific cutoff. Go just one font over the maximum and the Office apps would display a cryptic error message, then close. This didn’t matter since, really, who has that many fonts open on a regular basis? The limit is much lower now, though still much higher than most folks need. The Office apps don’t crash, they simply cut off the number of fonts shown at about 1,000. You always see all of the OS system installed fonts and the ones within the Office application packages. From there, Office starts alphabetically with your third party fonts and displays their names up to the limit. Anything beyond that is not shown. Only Excel shows you the reason why with this message:
Office 365:
Other than the activation difference - and even that is really the same procedure, except you start with a different first time installer - the app structure for Office 365 and 2019 is virtually identical. Meaning, you can follow these instructions for both Office 365 and 2019 to greatly reduce the number of fonts in the font lists.
We have switched to SoftMaker Office for use on our Macs. While I won’t say never, it’s unlikely I’ll be adding information specific to further perpetual license versions of Office. MS did confirm there will be at least one more perpetual license release. Since Office 2019 will not work beyond Big Sur, there is now an Office 2021 released in conjunction with macOS Monterey.
You may ask, why won’t Office 2019 work in Monterey? It’s because Microsoft changed their support model for the perpetual license versions. For the Mac, they’re now supported for three major OS releases. Period. Office 2016 will only run under El Capitan, Sierra and High Sierra. Office 2019 under Mojave, Catalina and Big Sur.
The $99 per year fee for six Macs is a far better value than getting individual licenses for Office 2019. When you figure a perpetual license release is going to happen roughly every three years, $300 is much, much less expensive. If you were to purchase six Home version editions of Office 2019 (the one without Outlook) at $150 per license, it would be $900. For the Home and Business edition with Outlook, it would be a whopping $1,500! Then you’d spend that again about three years from now if you always get the latest release when they become available. Even installing Office 365 for only two devices is cheaper than the perpetual license Business edition.
The one time cost perpetual license is now really only beneficial to a single user who will keep using that version until it no longer works in whatever is the last OS it will run under.
There are also these differences:
1. The code for Office 2019 was frozen back in May, 2018, so Microsoft could start changing its code and testing for a perpetual license. It has none of the features added between then and now for Office 365.
2. Office 365 will get every new feature as they become available. Not really important for the person whose documents tend to use the basic features. But for a business, it’s very important that you are always able to open client documents correctly.
There is one major annoyance in Office 365 and 2019. The font list shows a huge assortment of cloud fonts. You can click on any of them to use one. When you do, that font is downloaded to the /Users/your_user_account/
Library/Group Containers/UBF8T346G9.Office/FontCache/4/CloudFonts/ folder, and the cloud icon goes away. See below for how to stop Office 2019/2021/365 from showing cloud fonts.
16.22 update
Microsoft has rearranged the furniture - again.
What did Microsoft do in 16.22? For one, they completely eliminated the embedded Fonts folder. All fonts are now back in the DFonts folder. On the plus side, Excel no longer needs the embedded Times or TH SarabunPSK fonts. All four main production apps (Word, Excel, PowerPoint, Outlook) have the same minimum set of fonts. The font seguisym.ttf (Segoe UI Symbol) is necessary in order to see the right pointing arrow for a tab character, and possibly others if you are viewing non printing ( ¶ ) characters. All other fonts can be removed.
To access the DFonts folder, right click on each Office app, choose Show Package Contents and go to the Contents/Resources folder.
arial.ttf
arialbd.ttf
arialbi.ttf
ariali.ttf
ArialNarrowBoldItalic.ttf
ArialNarrowItalic.ttf
ArialRoundedMTBold.ttf
ariblk.ttf
Calibri.ttf
Calibrib.ttf
Calibrii.ttf
calibril.ttf
calibrili.ttf
Calibriz.ttf
Cambria.ttc
Cambriab.ttf
Cambriai.ttf
Cambriaz.ttf
seguisym.ttf
symbol.ttf
tahoma.ttf
tahomabd.ttf
Verdana Bold Italic.ttf
Verdana Bold.ttf
Verdana Italic.ttf
Verdana.ttf
webdings.ttf
Wingdings 2.ttf
Wingdings 3.ttf
Wingdings.ttf
As has been the case for quite a while, Word, PowerPoint and Outlook will not recognize the existence of Zapf Dingbats in the System folder. Somewhere along the way, which I missed, Excel no longer recognizes this font, either. If you need to use Zapf Dingbats in Office, you’ll have to copy the OS supplied version into the DFonts folder.
As with other recent versions of Office 365 and 2019, (in the embedded Resources folder) rename or remove the file:
applicationfontmetadata.json
If you prefer to leave the file and rename it, you can change it to anything so it can’t be "found". Adding any character to the beginning of the file name will do it.
At this point, you’re done with Word, PowerPoint and Outlook. In order to get Excel to show only the minimum fonts, we once again have to apply changes that used to only be needed for older versions of Office 2016.
In the embedded Resources folder of Excel, with the folder set to List view, click on the file fontFamilyImages1025.plist. Scroll down and Shift+click on the file fontsImages2052.plist to select it and everything in between. Delete all of the highlighted .plist files.
Next you need to edit the fontFamilyImages.plist and fontsInfo.plist files to fix the font lists so Excel in Office 365 and 2019 doesn’t keep displaying the names of fonts you just removed.
First, download BBEdit. You need a text editor that can properly display, edit and save an XML based .plist file. Open fontFamilyImages.plist and fontsInfo.plist with BBEdit and edit them so that both appear as follows:
You can remove most of the large amount of content quickly by clicking somewhere underneath the text, <plist version="1.0">. Scroll all the way down to the bottom of the .plist data and Shift+click somewhere near the bottom. That will highlight everything in between and you can delete the entire block of highlighted data in one move. Complete any necessary editing to duplicate the image shown here. BBEdit may need your admin password to complete the edit of these files. Enter that when asked so it can save your changes.
Now when you launch Excel in Office 365/2019, only fonts that exist on your Mac and what you’ve left in the embedded Fonts folder of Excel will appear in the font lists.
Cloud fonts in Office 365 and 2019, beginning in version 16.33
Windows users have had this very easy option to disable cloud fonts for a long time. It’s now, finally, part of the Mac version.
Open any Office 365 or 2019 app and open the preferences panel. Click on the Privacy icon. In the window that opens, click the Manage Connected Experiences button. Uncheck the bottom box, which will disable all three. You might be asked to restart Office in order for the privacy changes to take effect. Do so if necessary. Once done, all Office apps will stop showing the cloud fonts. Depending on what cloud options you may still want running, only the center check box (left image below) needs to be unchecked to stop the cloud font from appearing. Be aware this also (who knows why) prevents the Help menu from working.
A reader informed me they didn’t get the same privacy options, despite the fact we were using the same build of Office 365. The main difference was the OS in use. Catalina for myself, and Mojave for them. The reason to mention this is so you are aware you may get a different option screen than someone else with the identical version of Office.
Either way, the goal is to turn Connected services/Experiences off and say bye-bye to the cloud fonts.
Catalina options Mojave options
Cloud fonts in Office 365 and 2019 before 16.33
A reader by the name of Ben has discovered how to clear the cloud fonts from Office 2019. This also works for Office 365. Here are his instructions.
The list of cloud fonts is stored in a JSON file deep within your ~/Library folder. You can’t simply delete it; the next time you open an Office app, it will be regenerated. However, you can rewrite its contents so that none of the cloud fonts appear in your font lists. Here’s how:
Quit all the Microsoft Office apps that you have running.
1. In the Finder menu, click "Go" > "Go to Folder…"
2. A popup with a text field appears. Paste this path into the text field, then click the "Go" button.
~/Library/Group Containers/UBF8T346G9.Office/FontCache/4/Catalog/
3. In the Finder window that opens, control+click (or right click) the file named "ListAll_hier.Json", then select "Open with" > "TextEdit.app". (My note. I used BBEdit, but either will work).
4. In the TextEdit menu, click "Edit" > "Select All" and press delete. Then copy and paste the following text into the now-empty file.
{"MajorVersion":4,"MinorVersion":5,"Expiration":14,"Fonts":[]}
5. Save and close the file.
Note: ListAll_hier.Json is shared by all the Office for Mac apps. Editing the one file will remove the cloud fonts from all Office apps.
Office 2016:
Office 2016 no longer installs any fonts to the /Library/Fonts/ folder. All fonts installed by Office 2016 are embedded within each application package. They are within a folder named Fonts. All fonts in the DFonts folder are extras that do not affect Office 2016’s ability to function, and that entire folder can be removed.
A big thanks to MikeMuc at the German group MacTechNews for figuring out where Office 2016 hides the perpetual list of fonts, even if you’ve removed them. At least for now, we can once again get the number of fonts in Office 2016 down to only what’s needed, and have the font lists reflect that.
Microsoft transitioned Office 2016 from a 32 bit suite to 64 bit with version 15.25.
16.9 through 16.16.20
Microsoft drastically changed the internal workings with the 16.x release. Because Office 2016 now follows the sandboxing rules of the App Store, it’s been extremely difficult to remove fonts and have the apps behave accordingly.
This is a huge update. It includes not just a lot of security updates and fixes, but also new features and many improvements. For all intents and purposes, this amounts to a major 2018 upgrade from version 15.x to 16.x while still carrying the name, Office 2016.
Earlier versions of Office 2016 worked as expected, but beginning a few points releases back, Word, PowerPoint and Outlook will not list Zapf Dingbats.
Version 16.13 and forward has a new font set, TH SarabunPSK. It’s in the previously empty DFonts folder of Excel. This new font set is also in Word, PowerPoint and Outlook, but is in the embedded Fonts folder.
Fixing the font list in Excel is really, really simple. The DFonts folder is still there and contains the new font set, TH SarabunPSK. You can remove that set, but Excel will continue to show it in its font list whether the font is actually there or not. Easiest solution is to just leave it. Otherwise, all you have to do for Excel is open the embedded Fonts folder and get rid of everything except the full sets of Arial, Cambria and Calibri (it won’t launch without one of the Arial fonts). Open Excel and only the three remaining sets of embedded fonts, TH SarabunPSK, and what you have left on your Mac show in the font list.
Word, PowerPoint and Outlook pay no attention to the fact you already have Tahoma, Wingdings, Webdings and other fonts already on your Mac. Removed from within the application packages, they won’t even appear in the font list. In other words, you have to leave those fonts embedded in order to see and use them.
To see, and be able to use all fonts you expect in Word, PowerPoint and Outlook, leave this set in each of the application package Contents/Resources/Fonts folder. The font seguisym.ttf (Segoe UI Symbol) is necessary in order to see the right pointing arrow for a tab character, and possibly others, if you are viewing non printing ( ¶ ) characters. All other fonts can be removed.
arial.ttf
arialbd.ttf
arialbi.ttf
ariali.ttf
ArialNarrowBoldItalic.ttf
ArialNarrowItalic.ttf
ArialRoundedMTBold.ttf
ariblk.ttf
Calibri.ttf
Calibrib.ttf
Calibrii.ttf
calibril.ttf
calibrili.ttf
Calibriz.ttf
Cambria.ttc
Cambriab.ttf
Cambriai.ttf
Cambriaz.ttf
seguisym.ttf
symbol.ttf
tahoma.ttf
tahomabd.ttf
Verdana Bold Italic.ttf
Verdana Bold.ttf
Verdana Italic.ttf
Verdana.ttf
webdings.ttf
Wingdings 2.ttf
Wingdings 3.ttf
Wingdings.ttf
Unlike Excel, you can remove the TH SarabunPSK set without it refusing to vacate the font list.
Now that you’ve removed the physical fonts, you’ll see Office 2016 (other than Excel) still lists everything. To get it to show only the fonts that exist, you need to apply this last step. For Word, PowerPoint and Outlook, right click on each, choose Show Package Contents and go to the Contents/Resources folder. Rename, or remove the file:
applicationfontmetadata.json
If you prefer to leave the file and rename it, you can change it to anything so it can’t be "found". Adding any character to the beginning of the file name will do it.
You don’t really have to have any font set other than Arial in each app so they launch. But you will have problems if particular fonts are missing. For instance, without Symbol and the dingbat fonts, bullets that depend on those fonts will not display since as far as Word, PowerPoint and Outlook are concerned, they don’t exist, even though the exact same fonts have been installed by the OS and are in the same place every other app you use can access them from.
You can remove Calibri and Cambria from all of the Office apps, but be aware many folks will send you files that use them. They are also, of course, the default fonts for Office. You can’t even change some preferences if they’re missing. It’s only two sets. I’d suggest leaving them.
A very big note I hadn’t thought of before. All of the Office 2016 instructions above refer to the perpetual license, stand-alone version. They do not work properly with the volume licensed version of Office 2016. Much thanks to a reader for the following information as I only have the single user license to test with. The idea was to do the modifications above on one Mac, then copy the font fixed versions to all other Macs on the volume license so you only have to do the work once. Here’s what he discovered. His text was well written, and is presented pretty much verbatim.
Making copies of the updated packages is all well and good, but it only works if you have Office 2016 preinstalled on the Macs ahead of time (for non Office365 users). If your Office 2016 suite is serialized or VL (vol license) and Office365 sign-on is NOT used, copying over updated packages before a clean install will cause an “Offline” error at startup. And for serialized VL users, it wont work to use the included “Serializer” package, even after a restart. You have to delete the updated packages and install your VL/serialized package first. The version installed doesn’t matter as long as it’s the same version or LOWER than the custom/modified packages created.
Once the initial install of Office 2016 is complete, then the packages can be copied over successfully. In addition, it would be recommended to open each app to complete the first-run config (welcome screen with options to login with 365 if used and/or clicking the “Get Started” prompt.
Office 2011:
High Sierra, 10.13 and Mojave, 10.14 include many of the same named fonts Office 2011 installs on your system. Any time you manually remove fonts, you should then clear the font cache files from the system (section 17) and reset Font Book’s database (section 7).
Catalina, 10.15 or any newer version of macOS will not be mentioned for Office 2011 as Catalina will only run 64 bit software, and Office 2011 is 32 bit.
The fonts installed by Office 2011 go to the /Library/Fonts/Microsoft/ folder. Therefore, it creates conflicts with the existing similar fonts installed by macOS.
The Office 2011 installation creates a mixed bag of older and newer conflicting fonts. You need to manually sort them out as described next.
During the initial install of Office 2011, newer .ttf font sets replace those installed by macOS. Though some in El Capitan through Mojave are newer. The OS installed fonts are deprecated to a new folder named /Library/Fonts Disabled/. They are:
Arial.ttf
Arial Italic.ttf
Arial Bold.ttf
Arial Bold Italic.ttf
Brush Script.ttf
Times New Roman.ttf
Times New Roman Italic.ttf
Times New Roman Bold.ttf
Times New Roman Bold Italic.ttf
Verdana.ttf
Verdana Italic.ttf
Verdana Bold.ttf
Verdana Bold Italic.ttf
Wingdings.ttf
Wingdings 2.ttf
Wingdings 3.ttf
There is no need to keep the fonts in the /Library/Fonts Disabled/ folder since identically named versions have been installed. You can delete the entire Fonts Disabled folder if you wish. If you want to keep the latest revisions, you’ll have to do a Get Info on each of these fonts in both the /Library/Fonts/ and /Library/Fonts Disabled/ folders. Then check the version numbers and toss the older version of each. Any newer versions still in the Fonts Disabled folder then need to be moved back to the /Library/Fonts/ folder.
Office 2011 also installs conflicting fonts which are older than those supplied with High Sierra, 10.13 and Mojave 10.14. These are Mac legacy TrueType suitcase fonts, as opposed to much newer .ttf versions supplied with High Sierra through Mojave. So keep the .ttf fonts supplied with macOS and remove the following Mac legacy TrueType suitcase fonts from the /Library/Fonts/Microsoft/ folder:
Andale Mono
Arial Black
Arial Narrow
Arial Rounded Bold
Comic Sans MS
Georgia
Impact
Tahoma
Trebuchet MS
For at least the last couple versions of Office, Microsoft has used the font family Cambria as the default for Word and Outlook. If you prefer to use some other font as your defaults, you can change it. In Word 2011, open the Normal.dotm template in your user account at ~/Library/Application Support/Microsoft/Office/User Templates/. Press Command+D to call up the font palette. Choose the font and point size you prefer, then press the Default button at the lower left. Click OK. Close the template and save. All new documents will now open with your chosen default font rather than Cambria. For Outlook, open the preferences and click on the Fonts icon. Change the options to your preferred font and close the preferences. You must do this before removing any fonts Outlook uses by default. If either font in its preferences are not available when you click on the Fonts icon, the preference won’t open.
Once you have your preferences set for Word and Outlook, you can remove the rest of the fonts Office 2011 installs. If you use any of the preset documents from the Document Gallery, they will still open even if you remove every font Office installs. Any missing font the template looks for will simply be substituted with an existing font. Clicking anywhere on the substituted text will show the font name Word is looking for in the font selection drop down menu.
Personal notes on this subject:
I don’t need to, or want to see long lists of fonts. Most people don’t realize how hundreds of active fonts (that many people also never use) slows the entire system down. They take up space in RAM. It takes longer for the computer to start up. Longer for apps to load. Longer for those apps to display font lists, etc.
More importantly is they seriously get in the way of production work. Unnecessarily long font lists are bad enough, but if I need to use a client’s PostScript version of an Office embedded font, how do I know I’m using it? The lists in Office don’t change. Are you looking at the font you’re required to use for the project, or the one installed within the Office app? There’s no easy way to tell. The owners of print shops get very cranky when a client notices their slightly modified version of (example) Bookman Old Style wasn’t used, and you have to toss thirty thousand dollars worth of paper alone out the door and do the entire press run over. It’s either that, or sell them what you ran - if they’ll accept it - at a rather steep discount. If that sounds high to some folks, going through that much paper on a web press is very easy. It’s a big reason these instructions exist.
By far, one of the best things Microsoft could do for users would be to allow you to easily remove fonts you don’t need.


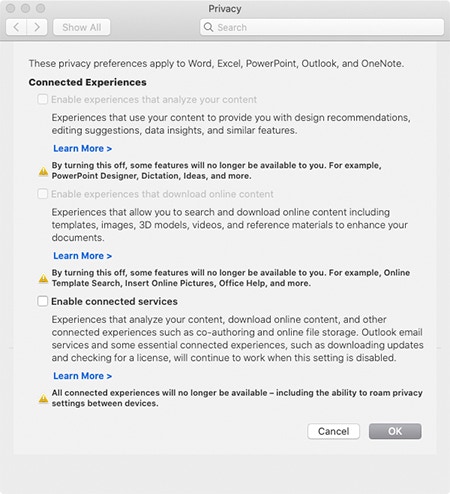
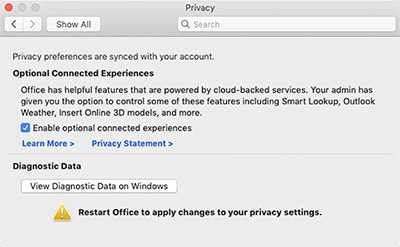
5. What to do with Connect Fonts
Suitcase Fusion:
All information for older versions of Suitcase can be found in the old article link. This information refers to the current subscription version, Connect Fonts.
To manually reset Connect Fonts, go to the ~/Library/Extensis/Connect Fonts/ folder, remove the file Connect Fonts.fontvault and restart your Mac.
You can also replace this file in Connect Fonts’ preferences. Click "New Vault" and choose the same location, which will appear by default. Say yes to replace the current vault.
Preserving fonts in the vault for Connect Fonts:
A warning with the above method for resetting all versions of Connect Fonts. If you have Connect Fonts set to store fonts you activate in its vault and you delete its database, they will all disappear with it. If you always activate fonts in place and never use the vault, then removing the database is safe to do at any time with any version of Connect Fonts.
If you are using the vault and need to reset any version of Connect Fonts, follow these steps first to save the fonts stored in the vault.
1) Your sets will be listed in the left pane under the "Font Library" heading. Highlight the first set and then Shift+click on the last set to select all. Press Command+D. It will ask you where you want to save your fonts. Navigate to an existing folder or create a new one. Choose your target folder and press the Choose button. Connect Fonts will save full copies of the vault fonts to that folder. They will also be saved in subfolders by the same name of all sets you had them separated by.
2) Quit Connect Fonts.
3) Go to your user account and remove the vault database noted above. Relaunch Connect Fonts.
4) Go to the folder you had saved your vault fonts to and drag and drop the subfolders of fonts into the Connect Fonts application. This will add them back to the vault and recreate your sets by the same names you were using before.
6. Controlling Helvetica fonts for prepress
If you work in a professional prepress environment, then this section will be important to you.
Do you need to remove Apple’s Helvetica fonts?
I note this since not everyone reading this section may be clear on why you would want or need to do this. Apple made the unfortunate decision to give their Helvetica fonts the exact same internal names as the long standing Type 1 PostScript fonts from Adobe and Linotype. This creates a fixed font conflict that can be definitively resolved only by removing Apple’s fonts from the system. This does not affect the newer OpenType Helvetica fonts available from Adobe and Linotype as they do not have the same internal names, and can therefore peacefully coexist with Apple’s versions. Since it can be imperative to use the exact same version of a font that was used to create a project, the conflict with the older Type 1 Helvetica fonts makes it necessary to remove Apple’s fonts.
This all started long before OS X/macOS. Apple’s Helvetica fonts have always conflicted with the Type 1 versions; but back in OS 9 and earlier, no one cared. Apple wasn’t using their Helvetica versions in the interface or any of its applications, so it wasn’t a problem to remove Apple’s Helvetica fonts from the hard drive and put your Type 1 fonts in their place. Then came OS X and Apple decided to start using Helvetica rather extensively in its applications design, forcing it to become a required font.
For the typical home user, there is no need to replace the supplied .dfont, .ttf or .ttc versions of Courier, Helvetica or Helvetica Neue. The information in this section is intended for advanced users. If you have no need to use older Type 1 PostScript or other older conflicting versions of Helvetica, Helvetica Neue or Courier, then please disregard these instructions. This avoids the possibility of your Mac becoming unusable by accidentally removing critical system fonts.
In all following cases, if you use Font Book and have manually removed Apple’s Helvetica fonts, you must also reset Font Book’s database. A damaged or orphaned Font Book database can also cause other font managers to be unable to activate or deactivate fonts, even if the Font Book application is not on the hard drive. It can even prevent fonts from activating that you manually place in a Fonts folder. So whether you use Font Book or not, you must delete/reset its database after manually removing fonts from the system. See section 7 under "Resetting Font Book’s database" for more details. If you have already removed Font Book and reset its database, you do not need to repeat these steps.
Removing Helvetica fonts in High Sierra through Catalina.
Copy Helvetica.ttc and HelveticaNeue.ttc to another location and then remove them from the /System/Library/Fonts/ folder. You will need to disable System Integrity Protection, or start up to another bootable drive/partition.
Connect Fonts and Helvetica fonts.
Connect Fonts can automatically circumvent the Apple Helvetica fonts through Catalina.
1) You can then delete the Font Book application if you wish (and actually, should).
2) Clear all font cache files and restart. See section 17 for more on font cache removal.
3) In Connect Fonts’ preferences, make sure the radio button for "Activate the requested font" is on. Also, have the check box on for "Notify if a conflict occurs". You should always know when a font you’re activating is turning another one off you may need for a current project (this check box disappeared in Suitcase Fusion 8).
Now you can leave Apple’s Helvetica fonts right where they are in the System folder. When you open a conflicting Helvetica font (normally a Type 1 version) it will pop up a box that fonts you are opening conflict with the System fonts. Continue and Connect Fonts automatically deactivates the system fonts in favor of the Helvetica fonts you just turned on. When you deactivate your Helvetica fonts, the Apple Helvetica system fonts are turned back on for you.
I have double and triple checked this in various applications, turning Type 1 fonts on and off while I had a document open. Activate your Type 1 Helvetica fonts and the Apple fonts disappear from the available font menus. Deactivate the Type 1 versions and the Apple fonts are once again back. Same with the Helvetica Neue fonts.
If you’d rather be completely sure rather than relying on Connect Fonts’ system to work, you may still want to remove Apple’s fonts from the system folder and manually activate them from a different location when you don’t need another version of Helvetica active.
General information for third party programs.
Microsoft Office 2016 used to have various issue if Helvetica Neue was absent, or was simply not the OS installed version. Version 15.39 and later don’t require the presence of Helvetica Neue at all.
The Adobe apps aren’t fussy. You can completely disable Apple’s version of Helvetica and enable a Type 1 PostScript version. So that at least is nice for prepress and other users of Type 1 PostScript fonts. You can have the T1 PS fonts open for a project and still have all of your Adobe apps work.
7. Font folder locations - Using Font Book
macOS uses a folder priority to locate and open fonts. This list is in order from highest priority to lowest.
~/Library/Fonts/
/Library/Fonts/
/Network/Library/Fonts/
/System/Library/Fonts/
/System Folder/Fonts/ (the OS 9 Fonts folder)
Fonts activated from Connect Fonts or other third party font manager not located on the Mac in any of the above folders are given the least priority overall. You can see then that a version of Helvetica activated by your font manager will be superseded by any version of Helvetica located in any of the previously listed folders. In order to use your PostScript fonts activated by your font manger, all like named versions must be removed from the higher priority folders. (Connect Fonts can bypass this limitation and override the system fonts).
macOS’s Font Book has preferential treatment here. By that, I mean fonts you activate using Font Book will get a higher priority over other font managers as it uses the folders listed above to activate and deactivate fonts. This, if you’re using the default method of adding fonts in Font Book. They are copied to the Fonts folder of your user account. As you can see in the list above, that folder has the highest priority.
The advantage of Font Book (besides being free) is that by knowing these rules, you can try to quickly force preference of one font over another of the same name by placing the font in a Fonts folder that has a higher priority, although you should always avoid knowingly doing this. A font conflict will almost always prevent either font from showing up in any application if both are active.
Font Book in High Sierra, 10.13 through Monterey 12
Automatic font activation has been removed from the preferences. Testing with both a Collection and a Library set confirms that auto activation has been removed from Font Book. Any fonts I disabled that were used in a test document were not turned back on when I opened the file again.
Font Book preferences in High Sierra through Monterey
Resetting Font Book’s database
At times, Font Book’s database can become corrupt. Usually from opening too many fonts, or fonts that are damaged. When you activate fonts with Font Book using the original method, not only are all fonts you’ve ever activated copied to the Fonts folder chosen in its preferences, but those fonts are also added as entries in its database (Library sets do not copy the fonts, but still do become entries in the database). Font Book uses this database to keep track of which fonts are active and which are not. The more there are, the longer it takes for your Mac to start up as Font Book must compare each font to the information in the database during startup to determine if a given font should be on or off. If the database becomes damaged, it can take a very long time for your Mac to start up to the desktop. If it’s really mangled, your Mac may not finish booting at all. Another symptom of a damaged database is not being able to activate or deactivate fonts from Font Book’s interface.
Manually removing fonts from your system will also ’damage’ Font Book’s database, so to speak. Font Book does not correct itself when you manually remove fonts that are listed in its database; not even after a restart. It then contains links to non existent fonts which causes the program to behave in the same manner as a corrupt database. You’ll find that you cannot activate or deactivate certain fonts, or any at all.
To reset Font Book completely, do the following in the order listed. It takes the least amount of time and only two restarts.
1) Quit Font Book. Open the Preferences folder in your user account and put the following two files in the trash.
com.apple.FontBook.plist
com.apple.FontRegistry.user.plist
The file com.apple.FontBook.plist keeps track of Font Book’s general preferences and activated fonts, whether as a standard or library collection. com.apple.FontRegistry.user.plist keeps track of deactivated fonts. Both may not be present. Delete what’s there.
2) Open Terminal and enter this command:
sudo atsutil databases -remove
Enter your administrator password when prompted. This removes all font cache files maintained by macOS.
3) Restart your Mac and immediately hold down the Shift key to boot into Safe Mode. Keep holding the Shift key until macOS asks you to log in to your user account (you will get this screen on a Safe Mode boot even if your Mac is set to automatically log in). Let the Mac finish booting to the desktop and then restart normally. This will clear the remainder of Font Book’s database and the cache files for the user account you logged into in Safe Mode.
Removing Font Book
As noted in section one, you really, really don’t ever want more than one font manager on your hard drive at a time. So, if you don’t use Font Book, it should be removed. You also need to remove its database. Leaving Font Book’s database on the drive can interfere with other font managers, even if the Font Book application itself isn’t running, or no longer exists on the hard drive. macOS will read this database (if it exists) during startup, or when logging into another account. Based on what that database says, the OS will fight to keep fonts active the database says are supposed to be, thus possibly preventing your preferred font manager from operating correctly.
Apple has protected both the Applications and Utilities folders for any program installed by the OS. This makes it a bit more difficult to remove Font Book, but not impossible. If you try to trash Font Book from the desktop, the OS states Font Book can’t be modified or deleted because it’s required by macOS. Don’t take this message to mean Font Book is now an immutable part of the OS. High Sierra through Catalina say this about anything it installed when you try to them delete from the Applications or Utilities folders. It’s hard to believe that Chess, Photo Booth, Stickies, or quite a few others are "required" by the OS. It will run just fine without them.
Follow the steps above under Resetting Font Book’s database. The goal here is to remove Font Book’s database.
Do not launch Font Book after this, or you’ll just have to repeat the above steps to reset Font Book.
In order to remove Font Book, you will have to either temporarily disable System Integrity Protection, or start up to another drive. The latter is much easier since anything on a drive or partition that is not the startup drive can be removed without disabling SIP. You only need your admin credentials.
If you disable SIP and restart to the same drive you want to remove Font Book from, use either of these steps:
1) Open the Terminal application in the Utilities folder. Highlight and copy the following blue colored line, then paste it into Terminal. You can, of course, type the command in yourself; but be very careful to enter it exactly as shown. Unix shows no mercy for any misplaced or mistyped characters.
sudo rm -r /Applications/Font\ Book.app
Press Enter. You will be asked for your admin password. Type it in (Terminal does not return on screen what you’re typing for a password) and press Enter. Font Book will disappear from the Applications folder. Close Terminal.
With High Sierra 10.13.4 and Mojave, using the above Terminal command is now required to remove Font Book. Even with SIP disabled, you cannot delete an OS installed app from the Finder while it is also the startup drive.
It’s either that, or boot to another drive or partition so you can remove whatever you want from a non-startup drive. This method does not require disabling SIP.
Re-enable System Integrity Protection after method 1 or 2.
As of Catalina, you can no longer remove any OS installed app that is on the startup drive using the Finder. They are all on a read only partition.
In Catalina, the Applications folder is now a Finder object. It holds both your installed third party software and is a link to the /System/Applications/ folder, where all OS installed apps actually reside.
By far, the easiest way to remove Font Book in Catalina is to boot to another volume with Catalina on it. You can then easily view the /System/Applications/ folder on the other, non-startup Catalina volume and delete Font Book. You can also use the Terminal method in section 2 for removing fonts to remove unneeded apps.
This can also be done from a Mojave or High Sierra startup drive. You just need to open the correct volume. A Catalina install from an older OS (that can also read an APFS drive) will appear as two separate desktop items. One with the name you gave to the partition you installed Catalina to, and a second with the same name, but with - Data appended to it. Double click the desktop icon without the - Data extension and navigate to the /System/Applications/folder.
8. Various other fonts you can move or remove
You can remove all of the OpenType fonts installed by InDesign or the Adobe suites so they aren’t active when using those programs. InDesign or the Adobe suite opens them from its own font subfolder, so while they’re available in the Adobe applications, other programs can’t see them. The location for these OpenType fonts is /Applications/Adobe InDesign CS/Fonts/. Although more commonly, the location is /Library/Application Support/Adobe/Fonts/. You’ll need to check both locations depending on which versions you’ve installed. Whether you install the Creative Suite, or the individual applications (Photoshop, Illustrator or InDesign; CS and CS2 versions), quite a few OpenType fonts will be installed in the latter folder. While no other applications or the OS will see those fonts, all of the CS and CS2 programs will. Move those fonts to another location for future use. Again, if you want to use those OpenType fonts for any program, you can activate them with Font Book, Connect Fonts, FontAgent or other font manager. You will also find a subfolder at /Library/Application Support/Adobe/Fonts/Reqrd/. Do not remove this folder or any of its contents. The Adobe applications require those fonts and will not launch without them.
The Adobe CS3 through CC applications now install all OpenType fonts they come with into the /Library/Fonts/ folder. These can all be removed. Those fonts required by the CS3 through CC applications are buried where only the Adobe programs can find them. There is no need for you to locate them. As in earlier versions, only the Adobe applications will see and use their required fonts.
Check the fonts in your ~/Library/Fonts/ folder. Again, look for duplicate fonts that conflict with the same name as those you prefer to use as a PostScript version and remove them.
If you have installed Acrobat or the free reader (older versions), you will find more PostScript versions of Helvetica and Courier in these applications’ Support folders. Since none of them are in a location that will be automatically activated by macOS, they can (and need to be) left alone. Only those applications that installed them will use those fonts if they are not already active otherwise.
High Sierra through Mojave include fonts intended for iWork. Apple essentially gives you these fonts, even if you don’t own iWork. In the /Library/Application Support/Apple/Fonts/iWork/ folder, you will various fonts. Because of the folder they are in, they are not automatically seen or used by the system. However, you can open them with any font manager in the usual manner; giving you some unexpected extra free fonts.
A few others you can copy include fonts within the Game Center app. Right click on Game Center and choose Show Package Contents. Drill down to Contents > Resources > Fonts. Make sure to copy the fonts you find there so you don’t break the Game Center app.
There’s a small treasure trove of fonts in Toast Titanium. Version 11 has 60 .ttf fonts. Right click on the Toast Titanium app. Drill down to the Contents > Resources > Fonts folder. Again, be sure to copy the fonts from this folder.
Did you ever find a folder named /Library/Application Support/Adobe/SavedFonts/, loaded up with a bunch of fonts identical to those in the /Library/Fonts/ folder? Those are old versions put there by Adobe. When you install most of Adobe’s older CS suites (and now with periodic major upgrades to the CC apps), the installers put a lot of OpenType fonts in the /Library/Fonts/ folder.
Where the fonts in /Library/Application Support/Adobe/SavedFonts/ come from is, for example, you upgrade CS5 to CS6. The installer looks for older versions of the same bunch of OpenType fonts it’s going to install and moves those older versions into the SavedFonts folder.
I suppose rather than toss them, Adobe decided there may be just enough kerning or other differences in them that a shop may need to go back to an older version to prevent type reflow. If you don’t think you need those older fonts, you can give ‘em the boot.
9. Do you need a font manager?
Do you need to use a font manager at all? Actually, no. You can activate fonts by placing them into any of the Fonts folders of your drive mentioned in section 7 and removing them when you want those fonts closed. For convenience sake, I would suggest always using the common /Library/Fonts/ folder. Fonts placed in this folder will be active to all users of that Mac. If there is some font you don’t want other users of that Mac to have access to, place them in your user account fonts folder, which is located at ~/Library/Fonts/. The most convenient way to use this method is to create an alias of the Fonts folder you want to use on the desktop. That way, you don’t have to keep opening the hard drive and clicking down through the folders of the disk hierarchy to get to it.
There is a disadvantage to this method though. You run the risk of damaging fonts by constantly moving/copying/deleting them from the folder you’re using to open and close them with. For these reasons, I do suggest using a font manager.
10. What is a font suitcase and why do we have them?
In decades past, computers had very limited amounts of RAM. This was partly due to the fact that RAM was extremely expensive. So most computers were outfitted with far less RAM than could be installed. This required the OS and applications to be as frugal with RAM usage as possible. Each font you activate takes up a small amount of RAM, so the Mac OS limited the number of fonts you could activate to 128. Since OS 9, computers generally have had more available RAM, so this limit was increased to 512. Designers, however, often wanted or needed to have more fonts open at once than the OS would allow; especially for projects like a catalog. The solution (more like a workaround) was to enclose fonts in a suitcase. The suitcase itself was counted as only one item by the OS in the Fonts folder; so you could open dozens or hundreds of fonts by enclosing them in a suitcase. Having fonts enclosed in a suitcase was also the only way the Mac OS would recognize fonts before OS X.
Using suitcases has become unnecessary on today’s computers with gigabytes of RAM and more capable operating systems. You see that with OpenType fonts. Each typeface of a font (italic, bold, etc.) is a file unto its own (those with a .ttf extension) rather than being placed together in a suitcase. Not that the usage of suitcases has ended. It’s a very convenient way of keeping a font set together. Apple’s .dfonts are suitcase files which contain the individual TrueType fonts for that family of fonts. There are four types of suitcase fonts currently in use:
1) Mac legacy TrueType suitcase fonts from OS 9 and earlier. These are 8 bit fonts limited to 256 characters, or glyphs. The suitcase can contain up to 999 individual TrueType or bitmap fonts. They can be of any font family. All data is stored in the resource fork of the fonts. It’s not at all unusual to see a mix of fonts found in programs such as greeting card and banner makers. They’ll give you a font suitcase named something like "Card Designer Fonts". You see just the one item on your desktop, but contains as many individual fonts as they put in it.
2) Type 1 PostScript fonts. These are two part fonts. One file is a suitcase containing all of the low resolution bitmap screen fonts. The rest are the outline printer fonts. As an example, here’s Adobe Garamond:
Adobe Garamond
AGarBol
AGarBolIta
AGarIta
AGarReg
AGarSem
AGarSemIta
The first file (highlighted in green) is the font suitcase of bitmap screen fonts. The rest are the individual outline printer fonts. Both must be in the same folder in order to work. When placed in a Fonts folder or activated with a font manager, the OS or font manager only looks in the suitcase for the available type faces.
If you have the printer outline font for the italic version of a font, but the screen font for the italic face is missing from the suitcase, then the italic font will not work. If you have the outline fonts without the matching suitcase, then none of them will work. In reverse, if you have the suitcase screen font for bold, but not the bold outline printer font; the bold font will show up as available in your font lists, but the printed output will be very low quality because the system will be forced to print the font from the low resolution bitmap font in the suitcase. Screen fonts in the suitcase that are missing the matching outline printer font are known as orphaned fonts. In later macOS releases, the OS will not load a suitcase that is missing its printer outlines. All data for Type 1 PostScript fonts is stored in the resource fork. They also are are 8 bit fonts limited to 256 glyphs.
Beginning back in El Capitan, neither the OS or any font manager will allow you to activate only a Type 1 PostScript suitcase as you could before. This is good since all you have are the screen fonts and it shouldn’t be considered usable. You must have both the suitcase and that font’s matching printer outlines to use it at all. You either have a complete font, or you don’t.
3) Apple TrueType .dfonts. They are essentially the same as the legacy Mac TrueType fonts from OS 9 and earlier with three major differences: (a) the data is stored in the data fork of the font rather than the resource fork (b) they are Unicode fonts and (c) like OpenType fonts they are 16 bit fonts which can contain 65,536 glyphs. However, they are not OpenType fonts as they have a different font table.
4) TrueType Collection. These fonts have a .ttc extension. Similar to a .dfont, it is a suitcase containing multiple TrueType fonts. Apple (for the most part) has moved to this suitcase type in Snow Leopard and later.
11. FFIL and LWFN. What are they and which is which?
There are a fair number of explanations to be found on the Web as to what FFIL and LWFN stand for, but in a nutshell they are the Type codes of the respective files. At the time Type 1 PostScript fonts were created, the Mac OS kept track of what type of file it was, and which application owned it, by its resource fork Type and Creator codes. The Type code of a font suitcase is FFIL. For the outline printer font, it’s LWFN. macOS and OS X can still use them, but Type and Creator codes are being replaced by a more modern method known as Uniform Type Identifiers.
Many Type and Creator codes have a meaning attached to them while others don’t; or at least not an obvious meaning. For Adobe Photoshop, an EPS file saved by the application has the meaningful Type code of EPSF; but the Creator code for any file saved from Photoshop is 8BIM. I’d never heard what that was supposed to stand for, if anything. So while there may actually be a phrase that FFIL and LWFN are an acronym for, from what I’ve been able to find they are nothing more than the assigned Type codes.
While you could call a .dfont an FFIL file since it is a suitcase, it’s not a Type 1 PostScript suitcase. Having a different Type and/or Creator code is what helps the Mac OS keep similar items from being opened in the wrong application or defined incorrectly. In reality though, .dfonts don’t normally even have Type and Creator codes.
A reader informed me that he was a beta tester for Photoshop v 1.01b. That version added 8 bit color support, which was huge at the time. The Creator code for Photoshop then became 8BIM, short for 8 Bit Image Map. A former employee of Adobe has confirmed the most commonly seen meanings for FFIL and LWFN found on the Web. They are: LWFN = LaserWriter Font, FFIL = Font File. Thank you both for your contributions.
12. External vs. internal font names
How many free TrueType fonts have you downloaded and found that many of them show up in your font lists with the name "New"? There is a reason for that. With all fonts the name of the file you see on your desktop has absolutely nothing to do with the names that show up in your applications. That is controlled solely by the font’s internal name. Those free fonts were likely created by someone who (1) didn’t know they needed to, (2) forgot to or (3) simply didn’t care about assigning a proper internal name to their creation. Windows TrueType fonts in particular, even those included with commercial applications, are a constant source of this type of confusion. It’s not at all unusual for a Windows TrueType font to have a file name something like TT145B3.TTF, but shows up in your application as its internal name of "Bumblebee". To be fair, this can be a problem with any Mac font suitcase, also, because there is no easy way to tell how many fonts are in the suitcase or what names they’ll produce in your font lists until activated.
Thankfully the designers of Mac fonts have almost always been kind enough to give the fonts they create descriptive file names, like the Adobe Garamond example above. Still the name of the suitcase is no true indicator of the font names that will show up in your programs, but historically this has been the case on the Mac.
Assigning the internal name is something the font’s creator must do when using a font creation program such as FontLab or Fontographer. You can also use these programs to change the internal name of a font, or assign one where the original creator of the font did not. Like those three hundred free fonts you have that all show up in your font lists as "New".
13. What is a font conflict?
In order to understand how font conflicts occur, it was first necessary in the previous section to explain internal font names. The shortest explanation of a font conflict is that two or more fonts you have activated are declaring the same internal font name to the OS.
Fonts are actually little programs. Or as once described by Adobe representative, Thomas Phinney, "Plug-ins for the OS". Fonts don’t just sit on the hard drive waiting to be called on. When you activate them, each individual font takes up a small amount of RAM; which (among a few other things) is needed to load the internal name the OS displays in your applications. If you are opening a suitcase, more RAM is used because multiple names must be created at once; especially if it’s a suitcase containing more than one font, such as a TrueType Collection, .dfont or Type 1 PostScript font can have. If the suitcase contains 30 fonts, it will open 30 separate tags in RAM.
So let’s say you activate a font with a file name of Courier and its internal name is also Courier. Then you activate a second font with a file name of "Courier Plus", but the designer made its internal name Courier. You now have two fonts declaring the same internal name of "Courier" in RAM with the obvious conflict; more than one active font saying it is Courier. When you go to choose them in your application, how can the OS or the application possibly know which one you mean to use? The answer of course is, they can’t.
Various things happen when you have font conflicts. Sometimes the font you just opened with the same internal name will take precedence over the one that was already open. Other times the font that was already active with that name will be the one to continue to show up in your programs, the new one won’t. Rarely, if ever, will you see more than one font with the same name show up in your lists. More likely, active fonts with duplicate internal names won’t show up in any program. Quark XPress is very good at having fonts disappear from its lists when there is a conflict. This is not a bad thing and I wish more applications would do that. It’s essentially letting you know immediately you have a font conflict by not showing you a font you’re expecting to see in its list of available fonts.
Conflicting internal names is exactly what the font problem is between Apple-supplied versions of Helvetica in High Sierra through Monterey and older Type 1 PostScript fonts. Apple gave almost every individual typeface exactly the same internal name as the Type 1 PostScript versions. Since the OS protects the system fonts from being disabled, you can’t open your preferred versions of Helvetica. This can be circumvented, however, by following the instructions in Section 6 for Catalina or older. For Big Sur and later, you simply can’t use Type 1 PostScript fonts that conflict with the OS installed versions. And you should be, anyway. Adobe is killing all support for Type 1 PostScript very soon. If you need PostScript, use their newer OpenType Helvetica fonts. These do not conflict with the OS versions.
14. Are you a good font, or a bad font?
Other than not being able to see a font you expected to, what is actually happening behind the scenes when you have a bad font? There are more problems that can occur with fonts than just conflicting internal names.
One issue is damaged fonts. Just like an application, fonts take up space in RAM. Typically it is a small amount. However, a damaged font, just like a damaged program, will do things it’s not supposed to. With fonts the most common issue from becoming damaged is a memory leak. A font may normally only take up a few Kbytes of RAM, but a damaged font can step outside the amount of RAM the OS thinks it is supposed to be using and take more. When this happens the font may overwrite data being used in adjacent RAM by another active application or the OS itself. Suddenly, data the OS or an application may need, or be looking for is gone; overwritten by the damaged font. Disabling the font might release the RAM back to the assigned program or the OS, but the damage is already done. In the case of an application, you will need to shut it down and relaunch it in order for it to behave correctly again. The OS will likely require a restart.
All other font issues are in how they are built. Free fonts are the number one source of these font problems. Free fonts known to be bad are Alien League and Brady Bunch. Both have an incorrect internal name. There are several name fields that need to be filled in by the font’s creator. Among them are the PS Font Name, Full Name, Menu Name and FOND Name. In the case of both fonts mentioned here, three of the fields have the same name as what the font is supposed to be, but both have Arial in the Full Name. So both conflict with the real Arial font. Another ’bad font’ is Radioactive. It has an incorrect PS Font Name which causes it to conflict with Times New Roman. These are three I know of, but I’m sure there are many more.
If you want to see the effects of this (it’s harmless, but annoying), download the Brady Bunch font and activate it. You can easily find this font by using "font+Brady Bunch" (without the quotes) as a web search. Google makes heavy use of Arial in the text it returns for a search. When you display such a page, Brady Bunch gets in the way of the regular Arial (Roman) font. Arial Bold will still be correct since that’s a different internal name and a separate font, but all regular Arial text will display in the Brady Bunch font. Now that you’ve seen it, deactivate the Brady Bunch font, toss it in the trash and everything will return to normal.
Newer info on the Alien League font: I don’t know if it’s due to this article, but Alien League has been updated and can now be downloaded from most sites as a correctly functioning font. There are still bad copies out there, but they are actually getting very difficult to find. You can’t go by the name of the font since both a bad copy and a fixed version are named alien5.ttf. Without a font editor to view the internal names with, you can’t really know which is which without activating it and seeing if Arial suddenly gets trumped by Alien League.
The Brady Bunch font has also been fixed. Lots of copies of the old bad version are still out there, but if you want a repaired version, download Brady Bunch Remastered.
With any font, there are multiple common errors they can possibly have. These issues can include outlines that make up the shape of a character having far more points than necessary to define a curve, having segments which overlap, paths running the wrong direction, and/or have stray anchor points. If you are unfamiliar with vector drawing, you draw a shape by placing down points. Between the points are Bézier line segments. You continue to draw your shape until you come around to your first point and close the path by connecting the last anchor point to the first. A path in Photoshop is an example of a vector outline, as is any such shape drawn in Illustrator. Fonts shapes are drawn the same way.
Free fonts may be poorly designed (and thus earn a ’bad font’ rating) due to the lack of effort by their creator. Many are done by drawing characters by hand with pen and paper, scanning them into the computer and then using a tracing program to create the paths. These result in rough fonts using hundreds to thousands more anchor points than necessary to create the outline shapes. Problem is, most people make no attempt to clean them up, but instead just drop the resulting paths into the font they’re creating. Yes, it saves a lot of time creating your font, but the end result is the junk they are.
Unnecessary points make the vector to raster processor work a lot more than it should have to when displaying the font to your screen and printing. Granted, computers do this so fast you’d have a hard time measuring the time difference between a well drawn font and a poor one, but it’s still an indication of quality over a slap-it-together font. Overlapping segments (Bézier lines) cause a break in an outline that shouldn’t exist. If a path is running the wrong direction (the outer path must be created in a clockwise direction, and the next inner path counter-clockwise), various things happen, depending on the character’s shape. For example, take the letter ’A’. Depending on correct or incorrect drawing of the outer and inner paths (for the hole in the middle), the character may display as just a solid triangle where the hole is, but invisible where it should be solid. A stray point is an anchor point that connects to nothing. Stray points can be particularly bad for RIPs. When the RIP comes across one, it sees the point, but it has no other instructions then what to do with it. It can’t draw anything since a single anchor point goes nowhere and isn’t a shape unto itself. It’s not a line, so the RIP can’t draw one. The RIP can’t fill a shape since there is none. The automated error handling of a RIP may be able to handle the problem, but otherwise may cause it to crash.
While there are a handful of good free fonts out there, the vast majority are worth exactly what you paid for them. For an excellent source of free fonts, head to Font Squirrel. I’ve downloaded and examined quite a few randomly chosen fonts. All are very well made. The owners of Font Squirrel vet the fonts you find there, so only the highest quality free fonts are made available.
15. Fonts you can and cannot use in macOS
Get ready to say goodbye to Type 1 PostScript fonts.
If your company hasn’t already been weaning itself off of Type 1 PostScript fonts, now is the time to start. With the release of Photoshop 2022, Adobe has now killed all support for Type 1 PostScript fonts with that app. Extensis also has an article about it.
Adobe has since added a new page explaining in detail what is going to happen when. Since Multiple Master fonts are also a Type 1 PostScript variant, these will also go the way of the Dodo.
All other CC apps are still recognizing Type 1 PostScript fonts, but it will only be for two more years. And when Adobe entirely drops T1 PS support, everyone else will likely follow.
When Catalina was in beta, Type 1 PostScript and legacy OS 9 fonts didn’t work. I filed a bug report and it was quickly fixed. Finding them out of whack again, I was considering filing another bug report. But when a reader sent me the above links, it become a moot point. I had heard a while back this may happen, but until seeing these pages at Adobe and Extensis, it wasn’t a certainty yet. Now there’s no sense fixing something that already has one foot in the grave and no balance left to prevent falling in the rest of the way. With those gone, I wouldn’t be surprised if the old legacy OS 9 style TrueType fonts, or ancient DOS/Windows .ttf and .ttc fonts also get kicked to the curb.
Why is this happening? One word: Unicode. None of these older font formats have it, and it was only a matter of time before they were relegated to the annals of history.
You can still use Type 1 PostScript fonts in Catalina through Monterey. The simple trick is to place these fonts directly into your user account Fonts folder. Also, the makers of Typeface have discovered Type 1 PostScript fonts work outside of your user account Fonts folder, as long as they’re not on the startup volume, and are activated in place. Full details here. Users of Font Book may not have noticed anything wrong since the user Fonts folder is where all newly added fonts get copied to by default. If you try to activate T1 PS fonts in place on the startup volume from anywhere other than your user account Fonts folder, you’ll get blank lines in the font lists of apps like Office 365, the Adobe suite, Quark XPress and others. For .dfonts, you can add them to any font manager via its interface. You can also still do this with old legacy OS 9 TrueType suitcase fonts, but they no longer work in some apps. In the Office 365 suite, Excel and PowerPoint will show OS 9 fonts, but Word and Outlook ignore them.
You also may have noticed in Big Sur and Monterey that Type 1 PostScript and legacy OS 9 TrueType fonts now display with a generic Unix EXEC icon. They still work as noted just above, but when Apple does things like this, it’s usually a very big hint something is going away.
How to convert your Type 1 PostScript fonts:
1. Online. There are numerous sites that will do font conversions for free. You simply upload your font via your web browser (usually one at a time), wait a few moments and download the converted font. Of the half dozen or so I tested, they work well, but is not something you’d probably want to do with hundreds, or thousands of fonts to convert.
2. Stand alone converters. This is all they do. They batch convert fonts from one format to another and are reasonably priced. The two I’d recommend are TransType and FontXChange.
3. Full featured font editors. From the most expensive to free, there’s FontLab, Fontographer, Glyphs 3, Glyphs Mini 2 and the open source FontForge.
You’d think FontLab’s premiere editor would be able to batch convert fonts, but I’ve never found a way for it to do that. Fontographer is from way back. FontLab bought it from Macromedia. The only reason I can think they wanted it was to offer a less expensive version to their own FontLab editor. But it is 32 bit only software and will not run on any Mac OS later than Mojave. Their description makes it pretty obvious they have no intention of ever rewriting the Mac version to to 64 bit and instead encourage users who already have Fontographer to upgrade to FontLab.
FontForge is free. It doesn’t natively batch convert fonts, but users can write scripts to automate FontForge functions. I did see a script for the Windows version to batch convert fonts. No idea if there’s a Mac script.
Fonts which can be used in macOS:
Apple Data Fork Fonts (.dfont) - A Unicode TrueType suitcase variation which allows for 65,536 characters per font.
Color Fonts (.otf .ttf and .ttc) - Until recently, you haven’t had this much fun with fonts! Think of them as Type 3 PostScript fonts on steroids. While those could only use simple fill patterns, shading and solid colors, color fonts can be darn near anything. You’ve actually been using one for a while and maybe didn’t even realize it - Apple Color Emoji.
There are four types of color fonts. The chart shown on this site checks off which types an OS directly recognizes. As of Mojave, macOS and Safari (version 12) now support three of the four color font versions, including SVG (Scalable Vector Graphics) fonts. Apps that don’t support SVG color fonts will see and use them, but only as a standard font.
Which apps and web browsers currently support color fonts are also listed on the site. For example, if you have the CC 2018 apps, Photoshop, InDesign and Illustrator can use both SVG and bitmap color fonts. Quark XPress 2018 fully supports all four types of color fonts.
Adobe has the Trajan color font active in Photoshop CC 2017 and later. You can add it to TypeKit for use in your other Adobe apps by heading to this site.
So, where can you get color fonts? Lots of places! There’s a link to download (currently) 182 free color fonts here. Or, buy them here. Lots to pick from and very reasonably priced.
Feeling creative? Fontself sells a $49 plug-in that works with Photoshop and Illustrator CC 2015.3 through 2022 to build your own.
The question you may ask. Are these just a gimmick? For those in prepress, maybe not a whole lot of interest. But for designers, they’re gold! Think of the time you had to spend in the past taking a plain font shape and then running it through lots of filters and other steps to get a chiseled look, metal, brush strokes, wood, etc. Now you just type!
I can see these fonts becoming commonplace and heavily used in a fairly short amount of time.
Mac legacy TrueType - Also a TrueType suitcase font, normally with no file extension. 8 bit fonts limited to 256 characters.
Mac Type 1 PostScript - Paired fonts comprised of a suitcase of screen fonts and the individual outline printer fonts. Most often without any file extensions. Sometimes the suitcase of screen fonts will have an extension that helps define that it is the screen font suitcase, but aren’t otherwise necessary. The file name extensions found on some suitcase files vary between .bmap, .scr and a few others. Originally, 8 bit fonts with a 256 glyph limit. Encoding options were updated later to allow for some extension of the number of allowed glyphs.
An example of a Mac Type 1 PostScript font can be seen in section 10 with Adobe Garamond. As you can see, "paired" doesn’t necessarily mean only two items. There is always just one suitcase of screen fonts, but there can be any number of printer fonts. Each printer font will have at least one matching screen font within the suitcase.
Multiple Master (Mac OS X 10.2 and later only) - A Type 1 PostScript variant. Rarely used in production. While older versions of Preview and the Acrobat Reader do depend on certain Multiple Master fonts for their operation, they are no longer produced by Adobe and have been declared obsolete.
OpenType (.otf .ttf and .ttc) - Unlike the majority of fonts between the Mac OS and Windows, OpenType fonts are Unicode and have the advantage of being cross platform compatible. They are 16 bit fonts capable of having up to 65,536 characters. Files with a .otf extension, which contain only CFF data will always be a PostScript font. TrueType OpenType fonts will have either a .ttf or .ttc extension. Unfortunately, this is not always true. The OpenType guidelines allows developers to use .otf for a TrueType structured OpenType font if they wish. So just by looking at it, it is impossible to know whether or not the .otf font you have is actually a PostScript font.
’Impossible’ sometimes has a workaround to it, so there are ways to find out if the .otf font you have is actually a PostScript font. Activate your OpenType fonts and then launch Quark XPress. In the list of fonts, Quark separates OpenType fonts by structure. A TrueType font will have the standard green and black OpenType icon. PostScript OpenType fonts will be shown with a red and black icon. Connect Fonts also notes which type of fonts they are. A PostScript font will be shown in the Type column as OpenType - PS, and a TrueType version as OpenType - TT.
OpenType Variable (.otf .ttf and .ttc) - These are essentially OpenType versions of the old Multiple Master fonts. But, they’re also a lot easier to use, in apps that give you the necessary controls. Adobe has a good overview on them (and includes a nice animated GIF of one in action) on this page. If you want to try a few, Photoshop CC lists several variable fonts you can use while in the app. You won’t find them anywhere on your drive. They are live fonts, but only appear in Photoshop from wherever Adobe hides them.
Windows TrueType (.ttf) - The Windows version of the original 8 bit, 256 character TrueType fonts.
Windows TrueType Collection (.ttc) - Windows version similar to Mac TrueType suitcase fonts. They can contain more than one TrueType font in a single package. This is again referring to the original 8 bit version, even though the same .ttf and .ttc file extensions are used for the OpenType versions.
Fonts which cannot be used in macOS:
Apple bitmapped fonts from OS 7.5 and earlier
Linux Type 1 PostScript - Paired fonts with .pfa and .afm extensions.
Type 3 PostScript - A fairly short lived PostScript variant. They allowed for the full use of the PostScript language such as shading, color and fill patterns. However, they lacked hinting, an important typography attribute. Obsolete.
Old, very old third party bitmapped fonts - Way back before TrueType or Type 1 PostScript fonts. There were no outline vector fonts for printing. Each point size for a typeface had to be built as a high resolution bitmap file from a companion program, or purchased separately. Good riddance.
Web Fonts - OpenType and TrueType fonts can be served from a remote computer to function as web fonts, but there are three other styles that only work in your web browser. Those end in the .eot, .woff, and .svg file extensions. macOS, OS X and any font manager will pay no attention to these font types if you try to use them directly on your Mac.
Fonts which can "sort of" be used in macOS:
Windows Type 1 PostScript - Paired fonts with .pfb and .pfm extensions. Normally, these fonts have never been able to be used on the Mac; not in OS9, OS X or macOS. Technically, you still can’t. You can’t open them with any font manager or use them by directly placing the fonts in one of the standard Fonts folders. But the Adobe applications (Photoshop, Illustrator, InDesign) starting with the CS2 suite can indeed read these fonts. Place them in the /Library/Application Support/Adobe/Fonts/ folder and you will be able to use Windows Type 1 PostScript fonts with (and only with) the Adobe programs. The CS4 through CC versions do not create the Fonts folder mentioned, but all you have to do is go to the /Library/Application Support/Adobe/ folder and create a new folder named Fonts.
For InDesign CC 2015 and later, there is now an empty Fonts folder in the /Applications/Adobe InDesign CC 2015/ folder for just this purpose. Use this folder if InDesign CC 2015 or later is the only app you need to see Windows Type 1 PostScript fonts. For no reason other than it’s faster to get to.
An example of a Windows Type 1 PostScript font is as follows:
DSSCR___.PFM
DSSCR___.PFB
This particular font is Dorchester Script MT. All Windows Type 1 fonts consist of two files for one complete typeface. A .pfm file for the font metrics, and a .pfb file for the binary data. You must have both in order for the font to work. If there were a bold version of this font, you would have another uniquely named matching pair of .pfm and .pfb files.
16. Font manager reviews
I’ve used (or at least tested) every font manager mentioned in this article. To help you make a more informed choice as to which one you may want to use, I’m going to list the pros and cons of each one as I see them. These are not exhaustive reviews, but focus on the more common features or omissions that make a given font manager easier or harder to use. Reviewed here are the current versions available at the time of writing, so some features may not be available depending on the version you are using. They are; FontAgent 10.0, Font Book in macOS 12.x Monterey, FontExplorer X Pro 7 (7.3), Connect Fonts (23.0.1), RightFont 6.0.5, Typeface 3.5.2 and FontBase 2.16.9.
If there is a font manager not mentioned here, it has either been discontinued (in which case I will remove the review), or is too simplistic to bother reviewing. A fair number of commercial font packages will include such basic font managers. They turn fonts on and off, and that’s pretty much it.
Generally, Type 1 PostScript fonts are limping along in Monterey. You can still activate them with various third party font managers, but they appear as question marks, or blank boxes in many apps. The workaround is to manually place them in the Fonts folder of your user account. Or, read this article from the makers of Typeface for another option.
There’s also an issue where activating or deactivating a large number of fonts in Font Book, FontAgent, FontBase and Connect Fonts caused TextEdit and Pages to freeze. The only solution was to force quit the frozen app and relaunch it. Other font managers do not cause this problem. Other apps with a font list may also be affected, but I tested the current managers mainly with these two apps. And this may be a Monterey issue as it’s the only OS I tested these apps under.
Connect Fonts
Pros:
1) Can create full sets that include font names already in other sets.
2) Can activate fonts in place. No need to create copies of the fonts you activate.
3) Has a reliable automatic font activation feature.
4) Font Sense technology virtually ensures auto activation will open the correct version of a font.
5) Lets you decide which font to activate or keep active when opening a conflicting font.
6) Has a vault option if you prefer to store copies of fonts that have been added.
7) Can control conflicting system fonts automatically.
8) Quickmatch feature helps you locate fonts which are similar to each other.
Cons:
1) Conflicting fonts cannot be acted upon individually.
2) Doesn’t catch as many bad fonts as FontExplorer X Pro.
FontAgent
Pros:
1) Copies all fonts you activate to a separate location in your user account. Therefore, even if you remove the original font or no longer have access to it, you can still activate the font from its working folder.
2) Can create full sets that include font names already in other sets.
3) Reliable automatic font activation.
4) Font Savant technology virtually ensures auto activation will open the correct version of a font. MagicMatch will give you close optional choices when the original isn’t available.
5) Includes Smasher.
6) Can disable all of the Supplemental folder fonts, or any combination of them you want.
Cons:
1) Fonts cannot be activated in place. Everything is copied to its working folder.
2) Does not inform you of a conflicting font that is already active in another set unless you’re using auto-activation.
FontBase
Pros:
1) Has a free version. “Awesome” version is a $3 per month subscription.
2) Can create font sets.
3) Can partially deactivate fonts in the Supplemental folder.
4) Incredibly fast at activating and deactivating fonts.
Cons:
1) Does not differentiate between identical fonts in separate sets.
2) Only understands OpenType and ancient 8 bit TrueType fonts.
3) All added fonts are copied to a working location.
Font Book
Pros:
1) It’s free.
2) Can create font sets.
3) Resolves font conflicts. Much better control in Lion through High Sierra than previous versions.
4) Can create Library sets to open fonts in place.
Cons:
1) Different library sets can contain the same fonts, but they must be linked from exactly the same location in order to activate them.
2) Resolving fonts always favors those in the /System/Library/Fonts/ folder. This makes it impossible to activate another type of font with the same name.
3) The conflict resolution function, whether using automatic or manual, can and will remove fonts from the main Library folder.
FontExplorer X Pro
Pros:
1) Can create full sets that include font names already listed in other sets.
2) Can activate fonts in place. No need to create copies of the fonts you activate.
3) Can be set up to behave like FontAgent and copy all activated fonts to a working folder to be managed from there.
4) Has an automatic font activation feature.
5) Lets you decide which font to activate when opening a conflicting font.
6) Very good at catching faulty fonts.
Cons:
1) Auto activation only looks for the correct internal font names. You could activate the wrong version of a font on an existing project.
RightFont
Pros:
1) Simple, straightforward interface. Even simpler than Font Book, which may appeal to novices.
2) Can disable all of the Supplemental folder fonts, or any combination of them you want.
Cons:
1) No method in RightFont to add duplicate fonts to handle modified versions.
Typeface
Pros:
1) Can create full sets that include font names already in other sets.
2) Activates all fonts in place. No copies are created.
3) Lets you decide which font to activate or keep active when opening a conflicting font.
4) Individual fonts in a suitcase can be activated or deactivated rather than all or nothing.
5) Can disable all of the Supplemental folder fonts, or any combination of them you want.
6) Very fast adding sets, and activating/deactivating fonts.
Cons:
1) None significant (in my opinion).
Font Book is included with macOS, so you can play around with it as much as you want. FontExplorer X Pro and FontAgent have versions you can download and use as fully functional software for 30 days. Connect Fonts and Typeface have a 15 day trial period. Plenty of time to run them through the paces.
Connect Fonts has solved the issue with the Helvetica system fonts. When you activate (for example) a Type 1 PostScript version of Helvetica (which will conflict with Apple’s versions) Connect Fonts automatically turn the system Helvetica fonts off! When you deactivate your preferred version of Helvetica, Connect Fonts automatically turns the Apple versions back on. See section 6 for more details. However, this only works in Catalina, which is the oldest version of macOS Connect Fonts will run under. If you want this ability in older versions of macOS, you’ll need to use more recent versions of Suitcase.
Part of the original point of this article was to work around the inability of most font managers to disable fonts in the two main Fonts folders from their interface. By manually reducing the fonts on your system to only those listed in Section one, it won’t matter that you can’t control the remaining fonts; and you shouldn’t be trying to deactivate them anyway. And per the OS versions listed in this article, you can only do this with El Capitan, Mojave and Catalina.
I consider full font sets a very big plus. When you have multiple projects going at once, you want to have a single set for each project that includes every font it uses, not just those that don’t already exist in another set. That makes your stop to your font manager a quick and painless process when you can simply turn off set three and turn on set ten. No need to search the other sets for fonts you still need activated. I also consider activating fonts in place a major plus. If you can activate a font right from where it is, why bother copying it to another folder as Font Book (standard set) and FontAgent insist on doing? The only advantage to that is if the fonts reside on removable media when you first activate them, so you may not have access to the originals later. But to avoid that, all you have to do is copy the fonts to your hard drive first. It’s not like they take up a lot of space.
Font Book in High Sierra through Monterey now allow you to open fonts in place by using Library sets. But there are still limitations to how you can add fonts. See below.
Here are my recommendations based on what I consider important.
Please note that some of these descriptions may not apply to the version of a given font manager you are using. Other than some older notes I leave for comparison, they are based on the versions which were current at the time of writing and may be a little, or drastically different from older versions.
1) Typeface: What a difference in the current 3.5.2! It is now so much better than the 2.3 version I tested before, I switched to it from FEX, given Monotype’s apparent disinterest in their app.
Typeface is vastly improved from the last time I reviewed this font manager. Only takes 5 seconds to activate 2353 fonts. Less to deactivate. All fonts appear and disappear quickly in the apps I tested with.
Typeface handles duplicated fonts correctly. I imported two duplicate sets and activated one. Activating the other set prompted me to skip or replace. It also treats all new fonts as "in place". It doesn’t store copies anywhere, which I find far more intelligent than copying everything you add as Font Book, Connect Fonts and FontAgent insist upon doing.
It now has a direct choice for Import > Supplemental System Fonts to make an easy set for those. Say goodbye to the 100 Noto Sans fonts and many others neither you or the OS need activated. You can deactivate all of the fonts in the Supplemental folder, or any individual ones you want.
Clicking on one font switches to a single view of that font. To prevent Typeface from doing that so you can select the individual fonts of a set to activate/deactivate, you can either hold down the Command key while choosing your fonts, or without a modifier key held down, move the cursor towards the lower right corner of a font. When you do that, a clipped area of that font’s window will appear. Click the icon that appears to select or deselect that font. You can skip around to any individual font to select or deselect them one at a time without affecting any previously marked fonts. Include the Shift key to select or deselect a range of adjacent fonts. Then right click on any marked font and choose to activate or deactivate.
To add sets, chose Import > Fonts from Folder from the menu bar (or right click on the left column and make the same choice). You can also drag and drop into the main right hand window, or onto the left hand sidebar.
If you’re like me and have removed the Font Book set (which is initially the only set), the set section disappears. A fix in 3.5.2 allows you to always add sets to the sidebar, even if it’s empty. And you don’t have to worry about dropping a new folder of fonts into the currently shown font samples. You’ll still get another new set, as you expected.
Is it a simple app? Not at all. It’s nearly the equal to Connect Fonts and FontExplorer X Pro with its feature set. And at only $35, it’s hard to go wrong with Typeface.
2) FontExplorer X Pro: FontExplorer X Pro has been discontinued. Their site now shows this text at the top of the page:
Important Notice!
FontExplorer X by Monotype has provided you with many years of sophisticated font management. However, like all good things, FontExplorer X is coming to an end. Starting June 30, 2022, this product will no longer be sold. Your software will continue to work as usual, but please be aware it will not be updated or supported after June 30, 2023. Don’t worry—we’re already putting some great things together to ensure you continue to have the best font management experience possible.
This makes it a ‘Do not buy.’ app. Yes, it does work in Rosetta 2 on M1 Macs, but Apple has a clear record of this type of backward support for only two or three major releases. Meaning, if you purchase FEX anyway, it will stop working entirely when Apple does away with Rosetta 2 in whatever is the current macOS release at that time. Monotype’s text very much suggests they’ll release something new to replace it soon. When we see it, this review will be replaced with a review on the new font manager.
Why moved to the number two spot? Because this app hasn’t received a major upgrade in over three years. They removed the user forum from their site about two years ago. As of March 2, 2022, and a long delay, the app did finally get an update to 7.3. This update made the Adobe CC 2021 and 2022 plug-ins for Photoshop, InDesign, InCopy and Illustrator Intel and M1 compatible. The app itself is still Intel native only.
FontExplorer X Pro supports full font sets. Full choice of which font to activate or keep active when you try to activate a font that conflicts with one that’s already on. Allows you to deactivate fonts in the /Library/Fonts/ or ~/Library/Fonts/ folders. Activation of fonts in place.
During its initial setup you get a check box to "Organize Font Files". This is where you determine how you want FontExplorer X Pro to handle your fonts. If you leave the box unchecked, then fonts are always activated in place. Turn the check box on and it operates in the same manner as FontAgent, by copying or moving the fonts you add to its own storage space in your user account. If you change your mind later how you want FontExplorer X Pro to handle fonts, you can open its preferences and make your changes.
Unlike FontAgent, you can keep fonts that have been removed from the interface in storage, if you’re using that option. A check box in the Advanced preference settings allows you to determine if items removed from the interface also removes the associated fonts.
The default set, Language Supports English is confusing. As an example, I duplicated a handful of fonts from the
/Library/Fonts/ folder and added them as a new set. As expected when using the option to Import font as duplicate, and then applying the same choice to all remaining fonts in the set, FEX added all of the duplicates as separate entries. As you would also expect, when you turn that set on, you are told all of these fonts are already active in the /Library/Fonts/ folder. I then chose to have FEX deactivate the currently activated fonts and applied that choice to all other fonts in my duplicate set. The duplicates in the /Library/Fonts/ folder were then deactivated.
All good so far. Just what you would expect the font manager to do. The problem is, after you’ve turned any of these duplicate sets on or off, the Language Supports English set continues to show those fonts as being off, even if they’re enabled in any set they’re listed in. Unless you have some great need for this set to exist; like you routinely work with multi language documents and it actually is at least somewhat important for you to know if a given font supports English encoding, I would suggest right clicking on that set and removing it. For no reason other than to avoid the confusion of having it give you the impression fonts are disabled or enabled. Either that, or just don’t click on it. It’s not there to control fonts. It’s just to let you know which fonts on your system support English encoding. Dark gray check box - yes. Light gray - no.
FontExplorer X Pro has a much improved interface (though still busy compared to Connect Fonts) and new features. Compared to the original free versions, I find it less cluttered than before, and therefore easier to navigate.
It’s also very fast (though no longer alone in that category). With a test of 2,300 fonts, it added all of the fonts in place in about 20 seconds. It activated the set in roughly 15 seconds. All of the fonts were available in every app. Disabling the entire set took about 5 seconds.
Auto activation is reported to be spotty. Fonts that should open with a document don’t. If it still relies only on seeing the correct font name, then you could open the wrong version of a font and not know it. Connect Fonts and FontAgent have a method of avoiding this possibly very expensive error.
This is never an issue for me as I simply don’t trust any auto activation feature, no matter who writes it. There’s too much money at stake in large print shops if the wrong font is used on a project. I make a set for each job I work on and put the fonts for that job in its own set. When I’m working on a project, only that set is on.
FontExplorer X Pro has a large number of options to fully control your fonts. Overall, it’s one of the best font managers available.
3) Connect Fonts: You may recall in my last review of Suitcase I had said it has become an app aimed mainly at large businesses. Well, it couldn’t possibly be any more true now. How many individuals or small businesses do you know who will willingly spend $108 per year, per computer, for a font manager? Read on. It’s not quite as simple as price.
Connect Fonts is the new name for Suitcase. It’s also the name of the online page you can access. Along with this new font manager, Extensis also has Connect Assets, which is a cloud based DAM (Digital Asset Management) solution. Connect Fonts and Connect Assets are separate subscriptions. So no, you do not get Connect Fonts as part of that $300 per year fee for Connect Assets. Each person must have their own license for either. Have 30 seats that require asset access? Then it will cost your company $9,000 per year just for that. Add another $108 per year ($3,240 total) for each of those 30 seats to also have Connect Fonts.
You do not need to use the online portion of Connect Fonts. It can be a stand-alone font manager on your desktop the same as you’ve always done with Suitcase. Though you do need it to use all of the online font options. More recent versions of Suitcase can access the online Connect Fonts page, but your options are limited.
You can connect to your online font library at connect.extensis.com/login. Enter your Extensis ID and password. Or, from the Connect Fonts app, click the Open in Browser button at the top. Since you’re already signed in with the app, you automatically get logged in online.
When you go to the Connect Fonts web page, it initially says 1 of 5 seats used, with the person who logged into the account with the same credentials as the desktop app being the administrator. Click the Invite button towards the top right to add up to four other users who can access your online font repository. You can do this individually, or as a bulk addition. For each person you add, you can assign them as Administrator, License Manager, or User. Presuming you only want one person to handle the fonts for your team of 4 possible additions, you choose User. From there, you can give them access to Modify what’s in your online font repository, or Read Only. There’s also a check box that allows the user account to Collect For Output. Lastly, you choose which Font Libraries (Team Libraries/Sets) you want each person to be able to access. Click the Send Invite button and the recipient receives this pertinent information in an email from Extensis (live email links removed for the purpose of this article):
Let’s get started:
1 Downloadand install Suitcase Fusion (the desktop client that pairs with Connect Fonts).
2 Launch Suitcase Fusion.
3 Login to Suitcase Fusion using your account credentials.
If you’re new to Extensis, a user account has been created for you, and you’ve received a separate email with
your temporary password.
4 Login to Connect Fonts (use the same login credentials as Suitcase Fusion).
5 Any shared Team libraries will display in the library panel on the left-hand side of the screen.
6 Get creative.
When I clicked the link in step four, it then showed 2 of 5 seats used. Even though I was on the same computer, in the same browser, the server presumed I logged in from elsewhere as the test account from the email address I set up. And it did show this in the browser as two users logged into the page. Myself as Administrator, and the test account as Read Only. So, as long as everyone has their own Connect Fonts app, or a more recent version of Suitcase, you can share specified font libraries in a team of up to five.
A rather slick option is the fonts via your browser. I let it install the Safari plugin (Chrome, Edge and Firefox work without it) and chose to create a new set in the browser. You then upload your fonts for that set. It’s a nice option for users on the run to have access to their legal font library no matter where they are, without having the fonts directly on their laptop. From the web page, it acts just like your desktop font manager with buttons to activate or deactivate fonts. Though the Connect Fonts app on your Mac must be running when you do this. Otherwise, nothing happens. And while you can choose one of your older registered versions of Suitcase in the browser, you cannot activate or deactivate the fonts within it. Connect Fonts is the only one that will tie in. Otherwise, it does work as advertised. Fonts I activated in the browser appeared in Photoshop, TextEdit and Pages. Inkscape and the SoftMaker Office suite did not. But that’s a fault with the apps themselves. Neither will pay any attention to fonts activated in place. If they’re not directly in the user account Fonts folder, the apps don’t see them.
Who thinks the new Connect combo is worth this kind of money? In my opinion, it would only be the large business model mentioned earlier. Firms such as Nike, Apple, 3M, or any company who need employees working around the city, country or even worldwide to be able to access both files and fonts for various products in the works. And want those assets available to all without having to shuffle them around on an FTP or as email attachments. It’s all right there in your browser as if you were using a local server. And without Connect Assets, it’s still a way for one person to consolidate and manage the fonts for a project with up to four others having access to the project fonts, ensuring all involved personnel are using the exact same fonts.
Since this article is mainly about font management, let’s pretend Connect Assets doesn’t exist and focus on Connect Fonts. It’s a noticeable improvement over Suitcase. Activating 2,300 OpenType fonts takes about a minute. Same to deactivate that amount. Still slow compared to other choices listed here, but much faster than it used to be. If you’re activating or deactivating a couple of hundred fonts, Pages and TextEdit will momentarily stall, but then work normally when Connect Fonts is actually done with the process. But like some of the other font managers noted here, if you try to activate/deactivate a couple of thousand fonts, Pages and TextEdit will just plain ol’ freeze. You’ll have to Force Quit and relaunch them.
During the initial setup of Connect Fonts you first choose if you want all new fonts added to the Vault, or used in place (original location). Which like before in Suitcase is really no choice at all since it adds all of the fonts you activate to the Vault anyway, and then removes them when deactivated. This first screen also gives you a choice of whether or not to enable Google Fonts in the interface.
Next, you choose which plug-ins you want active. All of the main Adobe suite apps are there, including the retired Adobe Sketch, but not Quark XPress or anything else outside of Adobe. Following that are boxes to check for updates automatically and whether or not to share system profile information with Extensis.
Lastly, you can choose to deactivate all non-required system fonts. Which means Connect Fonts can now control the Supplemental folder fonts like pretty much every other third party font manager. It doesn’t matter if you skip this choice since you can still turn these fonts on or off in the main interface afterwards anytime you want. This final setup screen also gives you an option to clean the font caches to end the setup routine.
As a basic judgement, Connect Fonts is a quite a bit of an improvement over Suitcase. And you don’t need Connect Assets in order to use the remote server option in a browser for your fonts. I just don’t know how many people Extensis believes are going to willingly part with $108 per year for a font manager. For a group routinely involved in team managed products, they will probably find value in it. Even though each individual user has to have their own copy of Connect Fonts, or Suitcase if that user is always only accessing fonts made available by the administrator of the online account.
However, let’s face a basic fact. You can get by without any font manager at all, including Font Book, by manually putting fonts into the Fonts folder of your user account to activate them, and take them out to deactivate. The benefit of a good font manager is it makes this chore much easier and more organized. But unless you truly see value in the browser option, which you don’t need at all if you’re using a desktop computer, or if you always have all of your fonts on the device you carry with you anyway, I don’t see any reason to spend this much money per year for a single user font manager when there are equally good choices for far less.
4) FontAgent: Auto activation is very reliable. Stable program that rarely crashes. Copies all activated fonts to another location, which I don’t find necessary. FontAgent 10 uses Sets, similar to Connect Fonts or FontExplorer X Pro. Much less confusing to have it behave the same as its competitors. Version 10 carries on with the well designed interface introduced in version 7.
You can now add a set for the Supplemental fonts folder. And even though FontAgent is managing copies of these fonts in your user account, which would all technically conflict with those in the
/System/Library/Fonts/Supplemental/ folder, it still manages to disable or enable any of them you wish.
That’s the good news. For professionals, it’s still a dangerous font manager to use. The one main issue I’ve mentioned for previous versions is still its greatest downfall. And that’s being able to activate multiple, conflicting fonts without the user ever once being informed by the app. And even that isn’t consistent. There’s only a preference to inform you of conflicts through auto-activation. Any sets you manually turn on that produce a conflict tells you nothing. As in earlier versions, if you have duplicate fonts in multiple sets, they all shown green (activated) when you turn any one of them on. I’ve long wondered, is FontAgent simply being smart enough to recognize the fonts are identical? So I tested it to find out.
As with all previous versions, FontAgent creates a repository in your user account of every font you add, saving its own copies of all of them. This time, I took a font and intentionally stripped a bunch of glyphs out of it and saved a copy to the same name. All internal names were the same, and since the fonts were now physically different, it should produce a conflict error. At least, that’s what you’d think.
If the fonts are truly identical, then no matter how many times you add the same duplicated font in different sets, FontAgent keeps one copy of the font, and one only, in your user account. So yes, it does realize they are 100% identical, which is why every single instance of a given font turns green when you activate it in any entry. So far so good, since that makes sense, once you understand why it’s doing that. Next, I added an unmodified font in one set, and then the modified version in another set. Turning one or the other on does not turn both green. Yes, again. FontAgent realizes they are not identical and has copies of both in the user account.
This all sounds logical and good. Right up until you turn one font on, and then the other. At this point, FontAgent simply should not let you do that. But you get no notice you’ve turned on not just a conflicting font, but a physically different one. Clicking on each one in the interface does show a preview for each "active" font in the bottom pane. And since I really hacked the modified one, it’s clear glyphs are missing. So it should be impossible for both to be active.
In your apps, as you would expect, only one instance of that font name appears in the menus. Which one do you get? Since you now have a font conflict, it’s essentially random. Sometimes the first font you activated is the one used, and other times it’s the second one. So we have the same issue as previous versions. You could end up using the wrong version of a client supplied font, which could result in the loss of hundreds, or thousands of dollars at your company’s expense.
If you remove any fonts or sets from the interface, FontAgent will also delete the related fonts from its storage location in your user account. You don’t get a choice of whether or not the fonts are removed.
FontAgent’s Font Savant technology, which is similar to Connect Fonts’ Font Sense, makes FontAgent a strong contender. Having auto activation open exactly the same fonts as before is extremely important in a production environment, saving you from both lost time and income because the wrong version was used. When the original font cannot be found, MagicMatch will show you the closest alternative it can find.
It’s also still slow. About 2 minutes to open or close 2312 fonts. Far better than the 20 minutes it took before to do the same thing, but it simply shouldn’t take this long. Like other managers I had this issue with under Monterey, Pages and TextEdit froze after activating or deactivating these test fonts, and they wouldn’t all appear in other apps.
Overall, FontAgent 10 is a very good font manager, but its biggest failure is that it may not warn you that a conflicting font you’ve turned on isn’t the one previously used in a document. This can be a tremendously costly error in production.
5) Font Book: Simple, but effective.
Using the original set method, all activated fonts are copied to the Fonts folder of the active user account (default). You can change it to copy all added fonts to the /Library/Fonts/ folder. Library sets do allow you to activate fonts in place without fonts being copied to the Fonts folder designated in Font Book’s preferences. There are problems, however. While you can create multiple Library sets that include the same fonts, they must be from the exact same location. Adding identical fonts from different locations will add them to the Library set, but then you can’t activate either one once they’ve been deactivated.
When you have conflicting fonts, those already installed in the /System/Library/Fonts/ folder always win. The opposite fonts will always be the ones disabled. All others in the /Library/Fonts/ or ~/Library/Fonts/ folders can be controlled, but you must do things in the correct order. If you tell Font Book to automatically resolve conflicts, the fonts which are currently active are always the ones to remain active. If you want the conflicting font enabled, you must first deactivate the active font. Then you you can activate the opposite font. This is true even in the conflict resolution interface.
Be very careful if you turn on Font Book’s preference to move conflicting fonts to the trash. For example, let’s say you have a font in the /Library/Fonts/ folder deactivated, and an identical font active from somewhere else (which you can do in a Library set). Now turn the font in the /Library/Fonts/ folder on. Since the font which was already active is always the one to remain on, when you resolve the conflict, the font in the /Library/Fonts/ folder will be deleted! Not kidding. Right out of the main Library folder. So not just you, but every user account on that Mac loses access to that font. This does not apply to Catalina or later since the OS installed fonts are locked down.
Font Book’s conflict resolution screen in High Sierra through Monterey actually improved, and does what you would expect! As an example, I duplicated Arial Regular from the /Library/Fonts/ folder to the desktop, then activated it in a new standard font collection. This copied the font to my user account Fonts folder. Font Book of course declared there was a font conflict. Clicking the button to automatically resolve the conflict did what most users would want it to do. It deactivated the Arial font in the /Library/Fonts/ folder, allowing the font you just asked Font Book to activate to be the active font.
While Font Book doesn’t tell you which conflicting font it disabled, you can click on each set and then expand the font in question. Clicking the expansion arrow next to Arial under Computer showed that Regular was off, while Italic, Bold and Bold Italic were still active, proving that the duplicate I asked Font Book to activate was indeed the version in use. So, thank you Apple for this tremendous improvement in conflict resolution. The user can now easily determine which version of a conflicting font is on or off.
All of those extra Asian fonts that show up in Font Book’s interface, which aren’t anywhere in the various Fonts folders, are buried in the Font Book application package itself. They used to be called Stub fonts, and have returned in Sierra through Monterey as subset fonts (same thing) buried deeply on the drive. Leave them alone.
The All Fonts heading has finally been fixed. At least in High Sierra through Monterey. Collections and Library sets now both appear in that list along with system installed fonts. Before, fonts you added to Library sets would not appear under All Fonts. The only fonts that will not be shown now are those Font Book intentionally hides. Such as the system’s San Francisco fonts.
A real killer for Font Book is how incredibly slowly it imports fonts. I’ve never been impressed with Font Book, and I think that comes across in my review. But I wanted to see how much of a difference there was between Connect Fonts, FontExplorer X Pro and Font Book in High Sierra. I brought a total of 2,500 various font types into each app (3,000 individual typefaces). I used activation in place for each so no font copying was involved. This is the time it took in each just to import the fonts. Connect Fonts - a bit under a minute. FontExplorer X Pro - less than 30 seconds. Font Book - one and a quarter hours! I have to say, I don’t know why anyone would want to use Font Book, or why Apple hasn’t junked the current version entirely and started over.
Font Book’s main downfall is how easily its database is corrupted. When that happens, you suddenly can’t activate or add some fonts, deactivate those which are already active, have fonts show up in some applications but not others, etc. The only fix is to restart in Safe Mode and back again with a normal restart to clear Font Book’s database. In later versions of the Mac OS, you can open the Preferences folder in your user account, put the files com.apple.FontBook.plist and com.apple.FontRegistry.user.plist in the trash and restart. This is an okay font manager for light home use, but not a production environment.
6) RightFont: Nice looking, but a simple font manager with few controls.
Very surprisingly (at least to me), RightFont and FontBase are given high ratings on many web sites doing font manager reviews, placing them above FontExplorer X Pro and Typeface. And I do mean surprising because they are anything but good. I can only reason the popularity of these apps compared to the far superior choices of FontExplorer X Pro or Typeface is they’re cheap. Or in the case of FontBase, free. Though at $59, RightFont is not cheap for how underwhelming it is. If you’re going to replace Font Book, spend the money on a truly useful font manager.
Why mention these font managers at all? I get emails once in a while asking if I’ve ever heard of xxx font manager, and could I do a review on it? Hence their inclusion. Take the review of these two font managers more as a reason to avoid them.
RightFont has gotten a massive visual makeover from version 4 and earlier. I had hoped the vendor had also done something to improve how it works. They haven’t.
Pages and TextEdit both freeze under Monterey when activating/deactivating 2300 fonts. It is better in version 6, though. In version 5, the apps froze and stayed that way until you force quit and relaunched them. Now they’re only unresponsive until RightFont is done activating/deactivating a large number of fonts.
Dragging and dropping a folder of fonts into the left column does not create a set by that name. Everything just gets lumped under the Font Library heading. In order to keep separated sets, you have to create a set folder first, then import the fonts you want within it.
You still cannot import duplicate fonts. Well, you can, but nothing actually happens when you do. When you import a duplicate, there is still, and always, only one of that font. This is bad. As noted in other font manager reviews, you must be able to truly allow access to fonts that have the same names. Clients long have, and still do send in modified fonts. If you use the wrong one on a project, it could cost you hundreds, or thousands of dollars to redo the work.
Imported fonts used to be separated by alphabetical subfolders. They now all go into one monolithic database. You have no choice here. There is no option to open fonts in place. Any fonts you import get added to an ever growing database in your user account.
You can now have your fonts separated by sets. As with previous versions, this does you no good if you need to bring in identically named fonts for different projects since you can still have only one font by that name in the database. It also suffers from the same major mistake as other less useful font managers. I created two folders with identically named fonts. Added both sets and turned one on. RightFont marked both sets as active. This, of course, comes back to the issue where RightFont will only add one of any identical font to the database. All others are ignored, even though they’re listed in separate sets.
RightFont 6 can properly disable all fonts in the Supplemental folder (or any number of them you wish). Do that by clicking on the System Fonts heading. A concatenated list of the System’s Fonts folder, and Fonts/Supplemental folder will be displayed. Click on any font and press Command+A to select all. Then right click on any font and choose Deactivate. When finished, all of the Supplemental folder fonts will be disabled. Those in the main /System/Library/Fonts/ folder won’t be since no font manager can control those. You’re free to disable or enable any number of fonts in the Supplemental folder.
Clicking on the expansion arrow next to System Fonts reveals the active user account name, All Users and System. Clicking on System shows you only the fonts in the /System/Library/Fonts/ folder. It’s a rather pointless heading since you can’t do anything with these fonts anyway.
It’s also slow. It took RightFont 4 minutes to activate 2,524 fonts, and just as long to deactivate them. This is far better than than the hour and fifteen minutes it takes Font Book to do the same thing, but it sure isn’t anything to brag about.
7) FontBase (free version): Meant to be used only with OpenType fonts. It will let you import Dfonts, Type 1 PostScript and OS 9 legacy TrueType, but it will not activate them. On a bit of a strange note, it has no issue handling ancient 8 bit Windows TrueType fonts.
FontBase does not pay attention to duplicate fonts. If you bring in two identical sets it will show both, but activating one set does the same to both. It shouldn’t do that. Only the set you chose should activate. The other set should be flagged as duplicates if you try to activate it.
It defaults to adding over 3000 Google fonts as a set. Delete that set if you don’t care about cloud fonts.
FontBase doesn’t even bother to show you the system fonts, but you can add the Supplemental folder as a set. You can then deactivate these fonts. However, it doesn’t work properly. If for example you disable the entire set, a lot of these fonts do disappear from your font lists, but not all of them. It does at least kill those annoying Noto Sans fonts. So, FontBase gets a partial pat on the head for doing a partial job.
On the plus side, it’s incredibly fast. 2300 fonts activated or deactivated in just 2 or 3 seconds! It takes just a bit longer to first create a set since every single font you add is copied to your user account at /Users/your_account/FontBase with a subfolder for every set you create, giving each subfolder the same name as the set. Fortunately, fonts don’t take up a lot of space. Still, it would be nice if it would skip this function entirely and just handle fonts where they are. That it makes full copies of the Supplemental folder fonts is likely why it doesn’t succeed in deactivating all of them. It’s trying to handle what are then all conflicting copies, while the OS tries to hold the original fonts open.
When you remove a set, it drops the copied fonts into the trash.
FontBase has become a fairly decent app. Especially for free. You just have to be aware it only handles OpenType and old 8 bit TrueType fonts, and that it will continually pester you to upgrade to the paid version at a $3 per month subscription. But the speed is amazing, even though it’s making copies of everything you add to the interface.
At minimum, Type 1 PostScript is being shown the door by Adobe for Photoshop in 2021. Dfonts and legacy Mac TrueType will likely be next. At this point, it somewhat no longer matters that FontBase only works with OpenType, or old 8 bit TrueType fonts.
Do RightFont and FontBase work? Yes, for what they do. Are they font managers I would recommend to professionals? No. They’re very minimalist managers with nowhere near enough features to be used in a production environment.
17. How to handle font caches
All types of software create and maintain cache files. The purpose of a cache file is to access frequently used data faster than it can usually be obtained from its original location. Since we’re talking about fonts, we’ll use them as an example. Any font activation causes the OS to create cached data of those fonts. This data is optimized for both faster retrieval and rendering; much faster than it would be to access the fonts themselves every time a call is made to draw a font to the screen. If over time you use a particular font less, even though it’s active, the cached data for that font may eventually be removed from the cache in favor of those being used more frequently. If you use the font again, its data will be added back into the cache in the assumption that the data will once again be needed more often. Hence, cache data is something that is always in flux whether it’s font data, data for the OS itself or any other program that use various types of caches.
Because that data is read from and written to so often, the data is bound to have errors introduced at some time. When that happens, you see odd problems. With fonts, it’s almost always garbled text caused by corrupt font caches.
Utilities you can use to clear your font caches are FontNuke, Cocktail and OnyX. The last two are powerful utilities which can do far more than just cleaning font caches. If you are not familiar with these applications, then I would caution you in their use as you could cause your Mac to become non functional, requiring a reinstall of the OS.
Connect Fonts, Typeface and FontExplorer X Pro come with cache cleaning tools. With Connect Fonts in the foreground, the option is under File > Clean Font Caches. This is a very thorough cleaning. It clears the the OS font cache files, and those for many third party apps which maintain their own separate font cache files.
FontExplorer X Pro has its tools broken down into three options:
(1) Clean System Fonts Folder
This choice refers to the entire system, not just the System folder. What this tool does is move any font that is not installed as part of the OS to a new folder on your desktop. A very quick and easy way to separate the OS X supplied fonts from those you’ve added. (Lion and later duplicate this feature in Font Book). This can be very helpful when you’re having trouble tracking down font issues. Once you run this option along with cleaning cache files and the remaining fonts are still misbehaving; then you know you need to at least reinstall the OS supplied fonts. See the instructions at the bottom of this article to see how.
(2) Clean System Font caches
Clears all font cache files for both the system and the active user account.
(3) Clean Application Font caches
Specific to clearing font cache files created by the Adobe apps, Quark XPress and Microsoft Office.
Using Typeface, shut down Typeface and all other apps. Hold the Option key and launch Typeface. Instead of the normal interface, you’ll get a list of choices. Click Clear Font Cache. You’ll then see an alert of what will occur. Click the Clear cache button. Enter your admin password to allow osascript to run (this is an OS installed Unix app). Then click the restart button.
Notes on cache files:
There is a right way and a wrong way to remove cache files. OnyX forces you to do it the right way by restarting immediately afterwards. So why is this right? As just noted, cache files are accessed frequently. If you remove any type of cache file and attempt to continue working, you could easily have just pulled the rug out from under an application that was reading (or worse, writing) to a cache file that was removed during the cache cleaning operation. The consequences can be anywhere from minor to disaster. The rules for clearing cache files are simple, but need to be followed to avoid potential data loss.
1) Quit all running applications. This is not optional - do it. While it doesn’t hurt to leave your font manager running, as long as it’s in a static state (not actively being used in any way), the only ’program’ running should be the OS itself. If you want to really be certain, shut down your font manager, too.
2) Use any of the utilities linked to in this section to remove the font cache files (Connect Fonts, Typeface and FontExplorer X Pro can also remove font cache data using an option within the application). If the program you use does not automatically force a restart, don’t take that to mean it’s okay to continue working. Restart your Mac immediately. Under no circumstances should you ever skip restarting after manually removing any type of cache data.
Rules do have exceptions, and one is Microsoft Office. It has its own font cache data which can be removed without restarting your computer. Though you still must first shut down any running Office applications. After closing all Office apps, remove the following files:
For Office 2011, the location is:
~/Library/Preferences/Microsoft/Office 2011/Office Font Cache
The Office 2011 Service Pack 2 (version 14.2.0) changed the location of many preference files, including the font cache data. It is now located at:
~/Library/Application Support/Microsoft/Office/Preferences/Office 2011/Office Font Cache
After removing the file, you can then launch any Office application to have it rebuild its font cache data.
Office 2016, 2019, 2021 and 365 do not appear to maintain their own cache. So a restart is required after you clear font cache data.
In OS 10.13.x High Sierra through 11.x Big Sur, you can also remove font cache files using the Terminal application.
Close all running applications. From an administrator account, open the Terminal app and enter the following command (or copy/paste it from here):
sudo atsutil databases -remove
Enter your administrator password when prompted.
This removes all font cache files maintained by macOS. Both for the system and the active user account. After running the command, close Terminal and immediately restart your Mac.
In Monterey, this has changed. After conversing with a developer over the period of about a week, we figured out (or, we’re pretty sure) what’s going on with the font cache in Monterey.
The Terminal command – sudo atsutil databases -remove – now returns an error message when trying to use it in Monterey. This is because the user no longer has any control over the system’s font cache. System fonts and their associated cache are located in a read-only part of the drive (see section 2), and cannot be changed by the user. Only the OS itself can access them. Therefore clearing the system cache is not necessary and can be static (this is our assumption).
Only macOS may change the system fonts in OS updates. When that happens, the system cache files should be updated accordingly as a new cache would then be required as part of the update. You could see that in the 12.3 update, which at minimum updated the Emoji font. Whatever day you apply that update on, all fonts in the System folder will be tagged with that date (no matter how many actually changed), and contents of the system’s cache file at
/System/Library/Frameworks/ApplicationServices.framework/Versions/A/Frameworks/ATS.framework/Versions/A/Resources/ReadOnlyDB/ will have the same date. The 12.3.1 update didn’t alter the font cache, or timestamps of the system’s fonts. That’s a pretty good hint no fonts were updated in that point release.
So for Monterey users, and presumably from here forward, you would use this Terminal command to clear only the user font cache:
atsutil databases -removeUser
This is the same folder Typeface, Connect Fonts, FEX and other tools clear in Monterey when you use their font cache cleaning function. You then must restart before the OS will build a new cache.
If you have no font manager or other app that has a font cache clearing option and prefer not to use Terminal, then the simplest way to do this is to restart the Mac into Safe Mode, and then restart normally.
18. Font 911
Q: "I removed the San Francisco fonts while cleaning out my system. Now my Mac won’t boot. Help!"
A: There are ways to get these critical fonts back onto your Mac.
1) This method is much less invasive or time consuming than reinstalling the entire OS. The only drawback is that you need access to another Mac running the same basic version of macOS (High Sierra, Mojave, etc.). Any Mac running El Capitan or later supports Target Disk Mode. Which methods you can use are listed in this article.
Place the non functioning Mac next to a working Mac and connect the two directly to each other using a cable that is common to the method they can use. It doesn’t matter if the Macs are on or not. The various connections mentioned in Apple’s aritcle are all hot plug-able connections and will not damage anything by doing so, though it is easiest to have both Macs off to start with. If the functioning Mac is not already on, turn it on first and wait until it is in a ready state. If the non working Mac is on, turn it off by pressing and holding the power button until it shuts off. Turn on the non booting Mac. Immediately hold down the T key to put the Mac into Target Disk Mode. Keep holding the T key until a large Target Disk Mode icon appears on the monitor. The hard drive of that Mac will now appear as a removable drive on the working Mac. Open it as you would any other disk and copy the San Francisco fonts from the working Mac to the same location on the non functioning Mac. The location is /System/Library/Fonts/. Once copied, dismount the hard drive of the Mac in Target Disk Mode by highlighting its icon and pressing Command+E. Or drag its icon to the Trash, which will change to an Eject icon. Turn the non working Mac off again using the power button. Disconnect the cable. When you restart your repaired Mac, it should boot.
2) The second method is similar to the first. Except here, you’re using an external drive with the same version of macOS on it.
Have your non functioning Mac off. Press and hold the power button if necessary to power the computer down. Connect your external drive to the Mac and turn the external drive on. Wait 10 seconds or so to give the drive time to get to a ready state. Turn on the Mac and immediately hold down the Option key. Continue holding the key until you get a screen showing which drives have a bootable system on them. This will take a minute or so as the Mac tries to determine if there’s a network drive attached. Once it is done searching (the normal arrow mouse cursor will appear), select the external drive by double clicking on its icon. The Mac will boot to the external device. Once ready, you can then copy the San Francisco fonts from the external drive to your main drive as described in method one. As the Option key method of booting is a temporary choice, you don’t need to open the System Preferences and reselect your main drive as the startup disk. Simply restart and your Mac will boot to the internal drive. Perform a Repair Permissions on your system when it has finished starting up.
3) For all Macs which shipped with Lion or newer, and you have no other drive or partition to boot to, restart the Mac and hold down the Command+R keys to boot to the Recovery partition. Reinstall the OS.
Q: "The fonts in Safari and many other applications are a garbled mess, or Safari and other applications won’t launch."
A: A common cause of applications not starting are corrupt fonts. But Helvetica Fractions in particular is known to cause problems, as is Times Phonetic. Don’t just disable these fonts in your font manager, but physically remove them from your system and try your applications again.
Q: "What in the world is with a question mark in a box?"
A: Are you seeing a strings of characters like this where there should be text in your web browser, email or other app?
The most common causes are that your font cache data is damaged, or you’ve turned on conflicting fonts. When either happens, the OS opts for the last resort to display something, anything there. Appropriately, this text is from the system font LastResort. Usually, for corrupt cache data, all you have to do is restart your Mac. If that doesn’t do it, then clear the font cache files from the system using Terminal, as described at the bottom of the previous section. If the problem appeared after enabling some new fonts, turn them back off and see if the problem corrects itself. If neither helps, you may need to reinstall the OS.
Yosemite was the last time the boxed A was used. There was quite a variety of boxed glyphs in the LastResort font then. In El Capitan and later, Apple threw almost all of them out. The main glyph used to signify a missing font now is a boxed question mark.

19. Determining if fonts are causing problems with applications
This can be difficult, as the problem could be related to fonts, preference files, system files, or a combination of the three.
First move all fonts in the /Library/Fonts/ and the ~/Library/Fonts/ folders to a new folder on the desktop. If you have pared your fonts down to the minimal list, this will leave only the basic fonts active in the /System/Library/Fonts/ folder (see list above in Section 1).
If your applications are still having problems, you then you need to determine if the problem is damaged system fonts or preference files. To do so, open the System Preferences. Click on the Accounts icon and create a new user account. Log in to that account and run the applications you are having trouble with. If they are still not operating, then it is likely that your system fonts are damaged, or possibly the OS.
Your next least intrusive step is reinstalling the fonts using the method below in the section, Reinstalling your fonts, or obtaining them from another Mac or external drive using one of the methods above.
If after all this your applications are still not functioning, then other basic OS system files are damaged; which only a reinstall of the OS can repair.
If your applications are now working correctly in a new user account, but you are still experiencing problems:
Then the preference files in your original user account may be what is damaged. There is no easy way to fix this, either. At least not one that will keep you from losing all of your individual preferences for each application. I suggest you open the Preferences folder in your user account and move everything in that folder to a new empty folder on your desktop; so the original is empty. Restart your Mac and login to your normal account. When the Mac is ready, you can remove the new account you made for testing in the first step if you tried that.
At this point, everything about your desktop will look as it did when you first installed the OS. The Dock, your desktop image, everything. For those applications that need certain preferences present to avoid having to reinstall them, you can try copying those particular preferences back from the folder you created on your desktop containing your original preference files and see if they work. If not, that preference file is damaged and you may need to reinstall the application. Others will simply let you reenter the serial number when it needs to create a new preference file.
Why you wouldn’t just reinstall the OS? Because your preference files would still be damaged if you reinstalled the OS, preserving your settings. If you performed a clean install, then your preferences would be gone and replaced with new ones. So you either will have accomplished nothing with a reinstall, since your original damaged preference files will still be there; or you will put yourself at the same point you would be if you had simply removed your preference files. Except it took you a lot longer to do the latter because you did a complete clean reinstall of the OS rather than just empty the Preferences folder.
Another option: You can also move all user fonts to one location to determine if only fonts are the problem. Move all fonts in the /Library/Fonts/ and ~/Library/Fonts/ folders to a new folder on your desktop. If your applications run normally, then one or more of your now disabled fonts is causing the problem. It doesn’t matter if the application uses a particular font or not; a damaged font can cause memory leaks and other memory related problems. Copy or move five fonts at a time into the /Library/Fonts/ folder. If behavior problems return, then one or more of the fonts you reactivated are damaged. Replace as needed.
20. Reinstalling your fonts
It is possible to restore your fonts without resorting to a reinstall of the entire OS.
Restoring fonts on Macs that shipped with (or have been upgraded) to High Sierra through Catalina:
Since Lion, Macs do not ship with any removable media for restoring the OS. You boot to the emergency partition by restarting and holding down Command+R. From there you can restore the OS or erase a drive and reinstall. A full install package for High Sierra or later is at least 5 GB. The entire hidden recovery partition is only 650MB. That tells you right away that this is not an entire system. If you do an erase and install, as much of the OS as is possible will be installed from the recovery partition. The rest will be downloaded from Apple’s servers and installed.
I wanted to see what fonts could be restored from the recovery partition. The result is that they are in a hidden .dmg file. In that disk image is a folder named /System/Library/Fonts/Base/. As an example, of the 245 fonts Mountain Lion ships with, only 51 fonts are in this folder. This one folder is actually a combination of fonts which normally go into the /System/Library/Fonts/ folder, and others in the /Library/Fonts/ folder. It’s not easy to get to. You need to first modify Disk Utility’s preferences to show hidden partitions so you can mount the Recovery drive. Then you run a Terminal command to show hidden files and folders. It’s not something a novice should attempt, so I’m not going to explain the entire process. There are so few fonts to recover from there anyway it isn’t worth the effort.
In High Sierra and later, the Recovery partition is not something you can easily get at. It is now a hidden partition and no longer appears in an Option key (boot manager) startup. The only way to see it at all is to type diskutil list in Terminal.
Whenever you get the opportunity to download an entire High Sierra or later system installer through the App Store (as in a system upgrade), do so. When the download finishes, it will want to install the OS. Immediately press Command+Q to quit the installer. You can then backup the full installer to a flash drive or external hard drive. Then you have it and can use the following instructions.
The following instructions assume you copied your High Sierra through Catalina download to an external drive or other location to save for future use.
Font locations for High Sierra through Catalina:
First, download Pacifist. After Pacifist has finished reading all of the installer packages, select the package that has the fonts you want installed (see below) and click the Install button on Pacifist’s menu. Only that package will be installed to its default location. For a complete set of fonts, reinstall both the /System/Library/Fonts/ and /Library/Fonts/ folders. All fonts you install from Pacifist will overwrite any identical fonts on your hard drive in the default locations, replacing any damaged fonts in the process. If you have copied or moved any of the default fonts to another location, they will still be there and will need to be deleted manually. All in all, this method is much quicker and easier than doing an entire reinstall of macOS to get your fonts back where they belong.
Since the OS that shipped with a Mac is usually machine specific, you can use the instructions below to reinstall the fonts, but do not use the .dmg from the App Store to reinstall the OS. To do that, boot to the Recovery partition (Command+R startup), or Internet Recovery (Command+Option+R startup).
Big Sur and Monterey are drastically different. Since you cannot (without great effort) remove fonts installed by the OS, I’m not going to list where to find them in the installer package. And that itself is very different. Large groups of items to install are in .zip files rather than individual packages.
For all more recent OS releases before Big Sur, right click on the OS installer and choose Show Package Contents. Double click the Contents folder, then the SharedSupport folder. Double click the file InstallESD.dmg to open the disk image. A disk image drive icon will appear on the desktop. A window should automatically open when the disk image is mounted. But if not, double click the desktop icon to open it. Double click the Packages folder.
Open the file OSInstall.mpkg with Pacifist. You can do this by dragging and dropping the .pkg file onto Pacifist’s interface. Once you have navigated to the Fonts folder of any location shown below, highlight the folder Fonts by clicking on it once. Click Install at the upper left of the Pacifist window. This will reinstall all fonts within that folder. You can also expand the Fonts folder to highlight individual fonts to reinstall only those you choose.
In order to reinstall any fonts to the /System/Library/Fonts/ folder, you must first disable System Integrity Protection (section 2). Doesn’t matter if you’re using Pacifist, or manually copying them into the folder from a backup. Be sure to re-enable SIP after you’ve restored any system fonts. Disabling SIP is not necessary for the
/Library/Fonts/ folder.
Catalina fonts: Contents of OSInstall > Contents of Core > System > Library > Fonts - this will also install the Supplemental fonts.
High Sierra and Mojave System fonts: Contents of OSInstall > Contents of Core > System > Library > Fonts
High Sierra and Mojave Library fonts: Contents of OSInstall > Contents of Core > Library > Fonts